 网硕互联帮助中心
版权声明:原创作品,谢绝转载!
1.系统准备
系统信息:
| 系统版本为centos7.9 |
| 安装的zabbix-server的版本为5.0 |
| 本机IP地址为10.0.0.81 |
| 使用的vmware workstation16.0 |
部署zabbix监控服务器之前需要首先做的事情:
(1)关闭selinux
[root@zabbix-server ~]# vim /etc/selinux/config
# This file controls the state of SELinux on the system.
# SELINUX= can take one of these three values:
# enforcing – SELinux security policy is enforced.
# permissive – SELinux prints warnings instead of enforcing.
# disabled – No SELinux policy is loaded.
SELINUX=disabled #修改enforcing为disabled
# SELINUXTYPE= can take one of three values:
# targeted – Targeted processes are protected,
# minimum – Modification of targeted policy. Only selected processes are protected.
# mls – Multi Level Security protection.
SELINUXTYPE=targeted
(2)关闭firewalld防火墙
[root@zabbix-server ~]# systemctl stop firewalld
[root@zabbix-server ~]# systemctl disable firewalld
(3)校准系统时间
[root@zabbix-server ~]# ntpdate ntp1.aliyun.com
29 Oct 14:39:42 ntpdate[1643]: step time server 120.25.115.20 offset -28799.910209 sec
2.安装配置zabbix-server
1.配置仓库
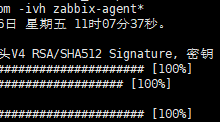
[root@zabbix-server ~]# rpm -Uvh https://repo.zabbix.com/zabbix/5.0/rhel/7/x86_64/zabbix-release-5.0-1.el7.noarch.rpm
Retrieving https://repo.zabbix.com/zabbix/5.0/rhel/7/x86_64/zabbix-release-5.0-1.el7.noarch.rpm
warning: /var/tmp/rpm-tmp.HHAkoj: Header V4 RSA/SHA512 Signature, key ID a14fe591: NOKEY
Preparing… ################################# [100%]
Updating / installing…
1:zabbix-release-5.0-1.el7 ################################# [100%]
2.安装zabbix-server和zabbix-agent
[root@zabbix-server ~]# yum -y install zabbix-server-mysql zabbix-agent
3.开启前端仓库
[root@zabbix-server ~]# vim /etc/yum.repos.d/zabbix.repo

4.安装php和apache 前端
[root@zabbix-server ~]# yum -y install zabbix-web-mysql-scl zabbix-apache-conf-scl
安装这两个包可能会提示rh-php72等的依赖问题,因为官方源的问题,所以可以使用centos7.9的vault源
[root@zabbix-server ~]# vi /etc/yum.repos.d/CentOS-SCLo-vault.repo
[centos-sclo-rh]
name=CentOS-7.9-SCLorh
baseurl=http://vault.centos.org/7.9.2009/sclo/x86_64/rh/
gpgcheck=0
enabled=1
然后保存退出,之后清除yum缓存并重建缓存即可
[root@zabbix-server ~]# yum clean all
[root@zabbix-server ~]# yum makecache
5.安装并启动数据库
[root@zabbix-server ~]# yum install -y mariadb-server
[root@zabbix-server ~]# systemctl start mariadb
[root@zabbix-server ~]# systemctl enable mariadb
Created symlink from /etc/systemd/system/multi-user.target.wants/mariadb.service to /usr/lib/systemd/system/mariadb.service.
6.登录数据库创建zabbix库
[root@zabbix-server ~]# mysql -uroot
Welcome to the MariaDB monitor. Commands end with ; or \\g.
Your MariaDB connection id is 2
Server version: 5.5.68-MariaDB MariaDB Server
Copyright (c) 2000, 2018, Oracle, MariaDB Corporation Ab and others.
Type 'help;' or '\\h' for help. Type '\\c' to clear the current input statement.
MariaDB [(none)]> create database zabbix character set utf8 collate utf8_bin;
Query OK, 1 row affected (0.00 sec)
MariaDB [(none)]> create user zabbix@localhost identified by 'zabbix';
Query OK, 0 rows affected (0.00 sec)
MariaDB [(none)]> grant all privileges on zabbix.* to zabbix@localhost;
Query OK, 0 rows affected (0.00 sec)
MariaDB [(none)]> set global log_bin_trust_function_creators = 1;
Query OK, 0 rows affected (0.00 sec)
MariaDB [(none)]> quit
Bye
7.初始化数据
[root@zabbix-server ~]# zcat /usr/share/doc/zabbix-server-mysql*/create.sql.gz | mysql -uzabbix -p zabbix
8.修改zabbix连接数据的信息
[root@zabbix-server ~]# vim /etc/zabbix/zabbix_server.conf
修改DBPassword为zabbix
[root@zabbix-server ~]# egrep ^DB /etc/zabbix/zabbix_server.conf
DBName=zabbix
DBUser=zabbix
DBPassword=zabbix
9.修改时区
[root@zabbix-server ~]# tail -1 /etc/opt/rh/rh-php72/php-fpm.d/zabbix.conf
php_value[date.timezone] = Asia/ShangHai
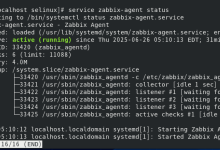
10.启动服务 server agent httpd php
[root@zabbix-server ~]# systemctl start zabbix-server zabbix-agent httpd rh-php72-php-fpm
[root@zabbix-server ~]# systemctl enable zabbix-server zabbix-agent httpd rh-php72-php-fpm
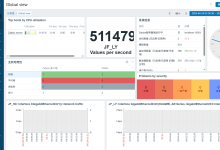
3.浏览器访问zabbix的web界面


更改中文界面


但是改完中文会发现有些地方还是有bug,比如下图这种

解决办法:
去windows上面随便选择一个字体复制到zabbix的字体目录下

我复制的是微软雅黑字体
[root@zabbix-server ~]# cd /usr/share/fonts/dejavu/
[root@zabbix-server dejavu]# ll
…
-rw-r–r– 1 root root 720012 Feb 27 2011 DejaVuSans.ttf
[root@zabbix-server dejavu]# mv DejaVuSans.ttf DejaVuSans.ttf.bak
[root@zabbix-server dejavu]# rz -E
rz waiting to receive.
[root@zabbix-server dejavu]# ll
…
-rw-r–r– 1 root root 720012 Feb 27 2011 DejaVuSans.ttf.bak
-rw-r–r– 1 root root 16829116 Mar 19 2019 MSYHBD.TTC
-rw-r–r– 1 root root 12139380 Mar 19 2019 MSYHL.TTC
-rw-r–r– 1 root root 19647736 Mar 19 2019 MSYH.TTC
[root@zabbix-server dejavu]# mv MSYHBD.TTC DejaVuSans.ttf
然后就可以看到中文显示正常了

到此,zabbix监控服务器部署完毕。详细使用请见后续发布的文章


![[阿里云ECS监控:无需ZabbixAgent的API方案] zabbix监控ecs服务器基于调用api方式-网硕互联帮助中心](https://www.wsisp.com/helps/wp-content/uploads/2025/06/20250602093557-683d707de3891-220x150.png)


评论前必须登录!
注册