 网硕互联帮助中心
目录
1、网卡规范名称
2、网卡配置文件目录
3、网络配置脚本
1、网卡规范名称
[root@server ~]# grubby –update-kernel ALL –args net.ifnames=0
# 内核中禁止使用net.ifnames模块,这样可以让网卡显示为ethx
# 后再重启reboot,使内核生效, 网卡名则显示为eth开头
2、网卡配置文件目录
——除RHEL9外配置网卡的配置文件目录
[root@server_node ~]# cd /etc/sysconfig/network-scripts/
[root@server_node network-scripts]# vim ifcfg-eth0
[root@server_node network-scripts]# cat ifcfg-eth0
DEVICE=eth0 # 网卡名字
ONBOOT=yes # 网卡服务启动自动激活网卡
BOOTPROTO=dhcp # 网卡工作模式
NAME=eth0 # 网络链接名称
[root@server_node network-scripts]# nmcli connection reload
[root@server_node network-scripts]# nmcli connection up eth0
连接已成功激活(D-Bus 活动路径:/org/freedesktop/NetworkManager/ActiveConnection/42)

# 还可配置IP
[root@server_node network-scripts]# vim ifcfg-eth1
[root@server_node network-scripts]# cat ifcfg-eth1
DEVICE=eth1 # 设备名字
NAME=eth_1 # 设备名称
ONBOOT=yes # 开网启动
BOOTPROTO=none # 工作方式
IPADDR1=172.25.254.100 # IP
NETMASK=255.255.255.0 # 子网掩码
GATEWAY1=172.25.254.2 # 网关
DNS1=114.114.114.114 # DNS
[root@server_node network-scripts]# nmcli connection reload # 法一
[root@server_node network-scripts]# nmcli connection up eth_1
[root@server_node ~]# systemctl restart NetworkManager # 法二

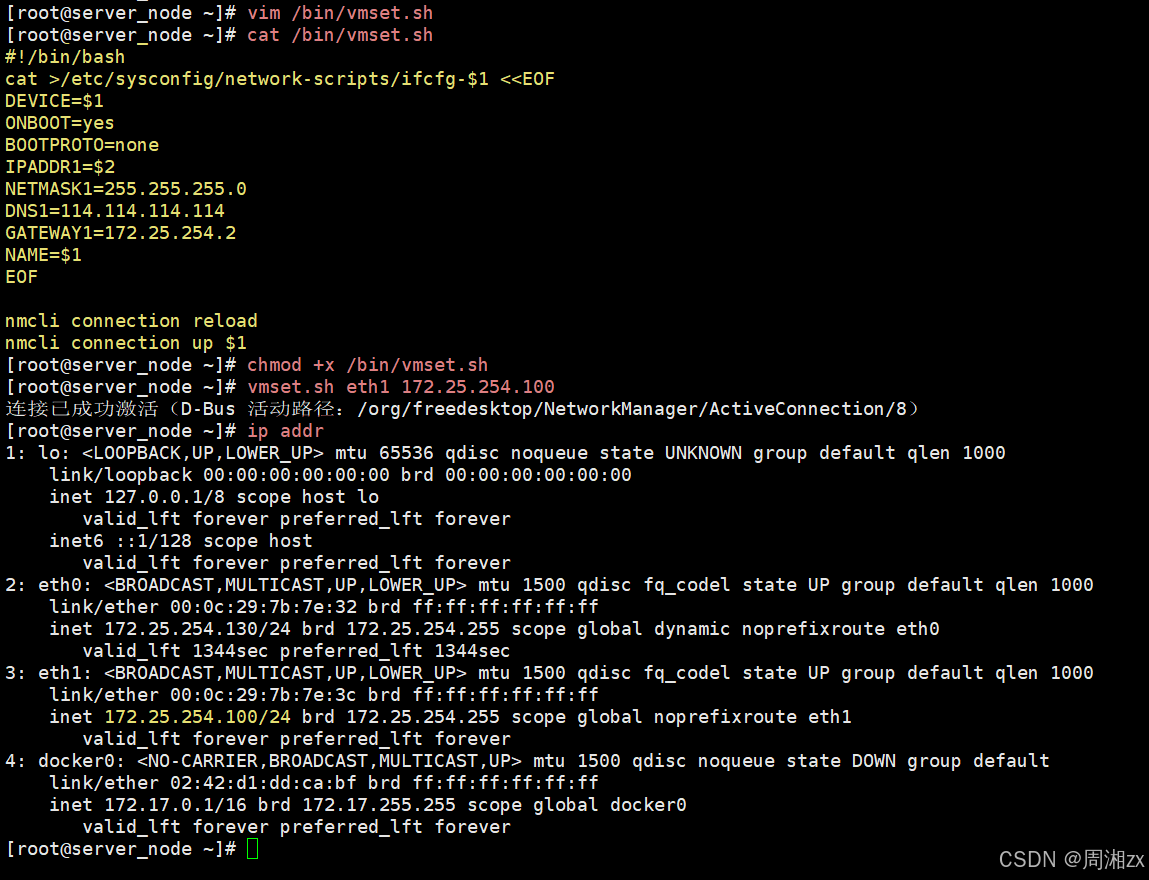
3、网络配置脚本
#!/bin/bash
cat >/etc/sysconfig/network-scripts/ifcfg-$1 <<EOF
DEVICE=$1
ONBOOT=yes
BOOTPROTO=none
IPADDR1=$2
NETMASK1=255.255.255.0
DNS1=114.114.114.114
GATEWAY1=172.25.254.2
NAME=$1
EOF
nmcli connection reload
nmcli connection up $1


评论前必须登录!
注册