 网硕互联帮助中心
前言:通过同时讲诉服务器和客户端的处理情况,来理通思维,便于理解整个Basic Authentication认证过程.
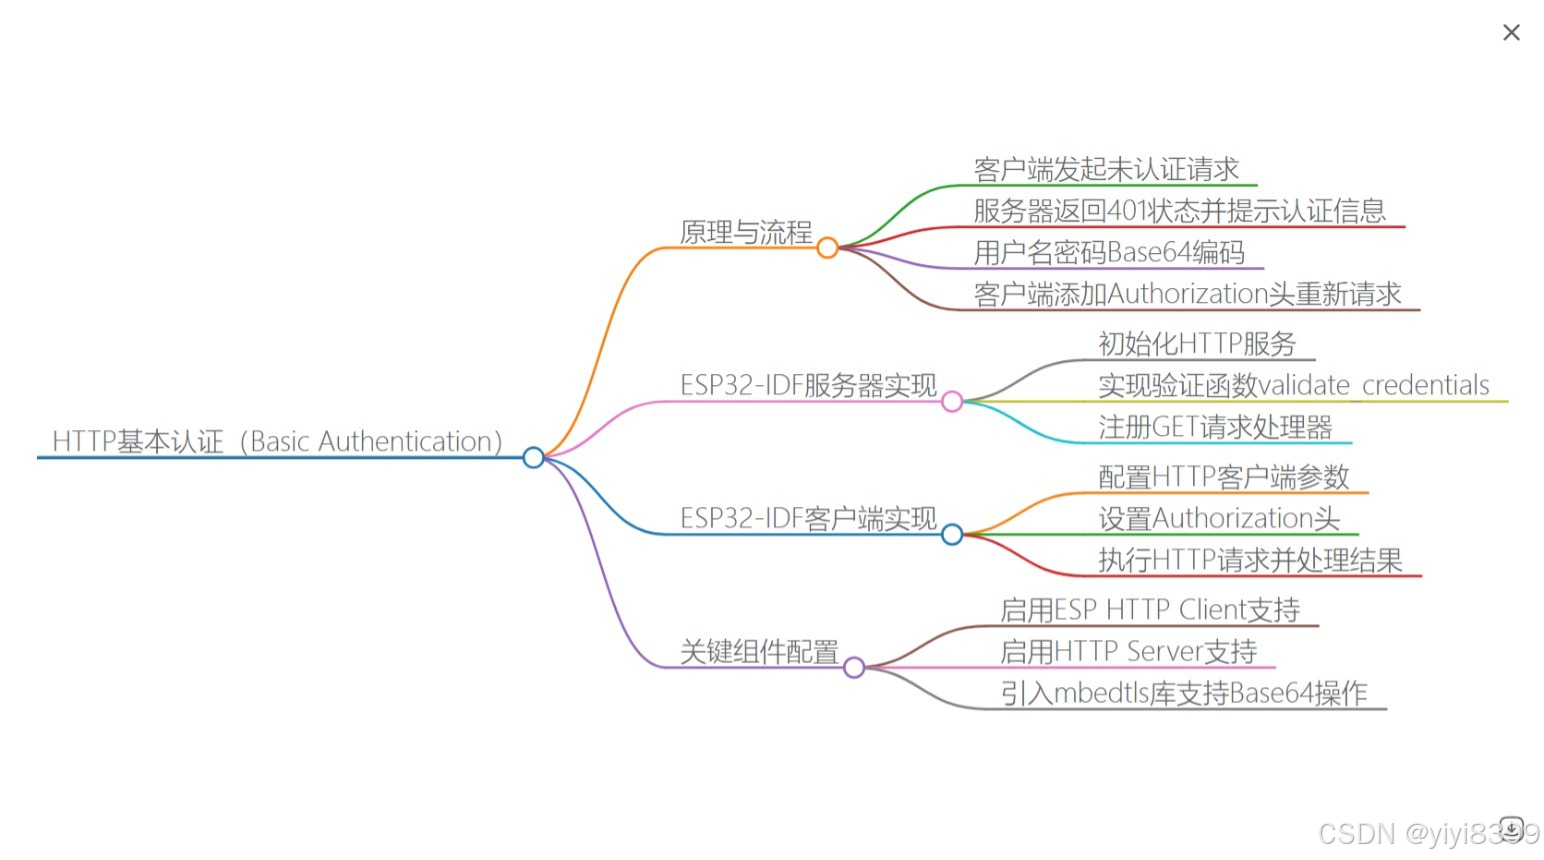
一.先普及一下基础知识:
Base64 是一种将二进制数据转换为 ASCII 字符串的编码方式,使用 64 个可打印字符(A-Z, a-z, 0-9, +, /)表示二进制内容,并在末尾用 = 填充。其核心目的是解决二进制数据在纯文本协议(如 HTTP)中传输时的兼容性问题。
HTTP 基本认证(Basic Authentication) 作用:将用户名和密码拼接为 username:password 格式后 Base64 编码,置于 Authorization: Basic <凭证> 头中传输。例如:
GET /protected-resource HTTP/1.1
Authorization: Basic dXNlcjpwYXNzd2Q=
Base64优势
文本协议兼容性 确保二进制数据(如加密哈希、文件内容)在 HTTP 头或 URL 中不因非 ASCII 字符被截断或转义。
简易性与通用性
- 所有编程语言均支持 Base64 编解码库(如 Python 的 base64、C 的 mbedtls_base64)。
- 无需复杂配置,适合快速实现轻量级数据封装。
Base64局限性
数据膨胀 Base64 编码后数据体积增加约 33%(每 3 字节二进制数据扩展为 4 字符),可能影响传输效率。
无加密保护 Base64 仅编码而非加密,攻击者可轻易解码还原原始数据(建议配合 HTTPS 弥补安全性)。
二.HTTP基本认证的原理
- 步骤1:客户端首次请求 客户端发送不带认证信息的HTTP请求到服务器受保护资源:GET /protected-resource HTTP/1.1
- 步骤2:服务器返回质询(Challenge) 服务器返回401 Unauthorized状态码,并在响应头中添加:WWW-Authenticate: Basic realm="SecureArea" 其中realm定义受保护资源的安全域,浏览器会弹出用户名/密码输入框。
- 步骤3:客户端发送凭证 用户输入凭据后,客户端将username:password拼接后进行Base64编码,生成Authorization头:Authorization: Basic dXNlcjpwYXNzd29yZA==
- 步骤4:服务器验证 服务器解码Base64字符串,分离用户名和密码进行校验,通过则返回资源,失败则重复步骤2。
- Base64仅为编码而非加密,凭证易被解码为明文,需配合HTTPS保证传输安全。
- 无法防御重放攻击,攻击者可截获凭证后重复使用。
Base64编码依赖 使用mbedtls/base64.h库进行编码,需在menuconfig中启用MBEDTLS_BASE64_C组件。
esp32 idf实现细节:
客户端发送请求访问受限区域,服务器返回401未授权,要求认证。客户端将用户名和密码拼接成“username:password”格式,进行Base64编码,然后放在Authorization头的Basic字段中发送。服务器解码验证,通过则返回资源。
对于服务器部分,需要ESP-IDF的httpd组件,创建HTTP服务器。处理函数中,检查请求头中的Authorization字段,如果没有,发送401,并设置WWW-Authenticate头。如果有,解码Base64,验证用户名密码。
对于客户端部分,使用esp_http_client组件。当发起请求时,如果服务器返回401,需要处理重试,或者直接预先添加Authorization头。自动处理401可能需要客户端自己处理,或者直接在第一次请求时添加Authorization头,避免401响应。
详细步骤:
服务器实现步骤:
1. 配置并启动HTTP服务器。
2. 注册处理程序,例如处理GET请求到某个URI。
3. 在处理函数中,检查请求头的Authorization字段。
4. 如果没有该字段,设置响应状态为401,添加WWW-Authenticate头,返回。
5. 如果有,提取Basic后面的凭证,进行Base64解码。
6. 拆分用户名和密码,与预设的进行比较。
7. 如果匹配,返回请求的资源;否则返回403禁止访问。
客户端实现步骤:
1. 配置WiFi连接,连接到AP。
2. 使用esp_http_client发起HTTP GET请求。
3. 构造Authorization头,将用户名密码拼接后Base64编码。
4. 将头添加到请求中,发送请求。
5. 处理响应。
现在,代码方面需要注意的点:
服务器端:
– 使用httpd_config_t配置服务器参数。
– 创建URI处理函数,检查请求头。
– 处理Base64解码,用户密码校验。
– 需要包含必要的头文件,比如httpd.h,以及base64编解码函数。
客户端端:
– 使用esp_http_client_config_t配置客户端参数。
– 生成Authorization头,其中Base64编码需要注意是否正确处理。
– 可能需要手动添加头字段。
Base64编码在ESP32中可以用mbedtls库中的函数,或者使用内置的base64编码函数。例如,esp-idf有提供base64_encode函数吗,或者需要自己实现,或者使用mbedtls的base64函数。
例如,使用mbedtls_base64_encode函数来编码用户名和密码的字符串。
注意,在拼接用户名密码时,中间用冒号连接,例如"admin:password",然后Base64编码。
在服务器端,收到Authorization头后,取出Base64字符串,解码得到"username:password",然后分割比较。
三.服务器代码
ESP32 IDF 实现服务器端代码 实现一个带有 Basic 认证的 HTTP 服务器。
#include <string.h>
#include "freertos/FreeRTOS.h"
#include "freertos/task.h"
#include "esp_system.h"
#include "esp_wifi.h"
#include "esp_event.h"
#include "esp_log.h"
#include "nvs_flash.h"
#include "esp_http_server.h"
#include "mbedtls/base64.h"
static const char *TAG = "http_server";
#define WIFI_SSID "YOUR_SSID"
#define WIFI_PASS "YOUR_PASSWORD"
static httpd_handle_t server = NULL;
// Basic 认证处理函数
static esp_err_t basic_auth_handler(httpd_req_t *req) {
const char *auth_header = httpd_req_get_hdr_value_str(req, "Authorization");
if (!auth_header) {
httpd_resp_set_status(req, "401 Unauthorized");
httpd_resp_set_hdr(req, "WWW-Authenticate", "Basic realm=\\"Restricted Area\\"");
httpd_resp_send(req, "Authentication Required", HTTPD_RESP_USE_STRLEN);
return ESP_OK;
}
if (strncmp(auth_header, "Basic ", 6) != 0) {
httpd_resp_send_err(req, HTTPD_400_BAD_REQUEST, "Invalid auth header");
return ESP_FAIL;
}
const char *encoded_creds = auth_header + 6;
uint8_t decoded_creds[128];
size_t out_len;
int ret = mbedtls_base64_decode(decoded_creds, sizeof(decoded_creds), &out_len,
(const unsigned char *)encoded_creds, strlen(encoded_creds));
if (ret != 0) {
httpd_resp_send_err(req, HTTPD_400_BAD_REQUEST, "Base64 decode failed");
return ESP_FAIL;
}
decoded_creds[out_len] = '\\0';
char *username = strtok((char *)decoded_creds, ":");
char *password = strtok(NULL, ":");
if (!username || !password) {
httpd_resp_send_err(req, HTTPD_400_BAD_REQUEST, "Invalid credentials");
return ESP_FAIL;
}
// 验证用户名密码(示例为 admin/password123)
if (strcmp(username, "admin") || strcmp(password, "password123")) {
httpd_resp_send_err(req, HTTPD_403_FORBIDDEN, "Invalid credentials");
return ESP_FAIL;
}
httpd_resp_send(req, "Authenticated Successfully!", HTTPD_RESP_USE_STRLEN);
return ESP_OK;
}
// URI 路由配置
static httpd_uri_t uri_handler = {
.uri = "/",
.method = HTTP_GET,
.handler = basic_auth_handler,
.user_ctx = NULL
};
// 启动 HTTP 服务器
static void start_webserver() {
httpd_config_t config = HTTPD_DEFAULT_CONFIG();
config.lru_purge_enable = true;
if (httpd_start(&server, &config) == ESP_OK) {
httpd_register_uri_handler(server, &uri_handler);
ESP_LOGI(TAG, "HTTP server started");
} else {
ESP_LOGE(TAG, "Failed to start server");
}
}
// WiFi 事件处理
static void wifi_event_handler(void *arg, esp_event_base_t event_base,
int32_t event_id, void *event_data) {
if (event_id == WIFI_EVENT_STA_START) {
esp_wifi_connect();
} else if (event_id == IP_EVENT_STA_GOT_IP) {
start_webserver();
}
}
// 初始化 WiFi
static void wifi_init_sta() {
esp_netif_init();
esp_event_loop_create_default();
esp_netif_create_default_wifi_sta();
wifi_init_config_t cfg = WIFI_INIT_CONFIG_DEFAULT();
esp_wifi_init(&cfg);
esp_event_handler_register(WIFI_EVENT, ESP_EVENT_ANY_ID, &wifi_event_handler, NULL);
esp_event_handler_register(IP_EVENT, IP_EVENT_STA_GOT_IP, &wifi_event_handler, NULL);
wifi_config_t wifi_config = {
.sta = {
.ssid = WIFI_SSID,
.password = WIFI_PASS,
.threshold.authmode = WIFI_AUTH_WPA2_PSK
}
};
esp_wifi_set_mode(WIFI_MODE_STA);
esp_wifi_set_config(WIFI_IF_STA, &wifi_config);
esp_wifi_start();
}
void app_main() {
nvs_flash_init();
wifi_init_sta();
}
四.客户端代码
实现一个通过 Basic 认证访问服务器的客户端。
#include <string.h>
#include "freertos/FreeRTOS.h"
#include "freertos/task.h"
#include "esp_system.h"
#include "esp_wifi.h"
#include "esp_event.h"
#include "esp_log.h"
#include "nvs_flash.h"
#include "esp_http_client.h"
#include "mbedtls/base64.h"
static const char *TAG = "http_client";
#define WIFI_SSID "YOUR_SSID"
#define WIFI_PASS "YOUR_PASSWORD"
#define SERVER_URL "http://SERVER_IP/"
// HTTP 客户端任务
static void http_client_task(void *pvParameters) {
const char *username = "admin";
const char *password = "password123";
char credentials[64];
snprintf(credentials, sizeof(credentials), "%s:%s", username, password);
unsigned char encoded_creds[128];
size_t encoded_len;
int ret = mbedtls_base64_encode(encoded_creds, sizeof(encoded_creds), &encoded_len,
(const unsigned char *)credentials, strlen(credentials));
if (ret != 0) {
ESP_LOGE(TAG, "Base64 encode failed: %d", ret);
vTaskDelete(NULL);
return;
}
encoded_creds[encoded_len] = '\\0';
char auth_header[128];
snprintf(auth_header, sizeof(auth_header), "Basic %s", encoded_creds);
esp_http_client_config_t config = {
.url = SERVER_URL,
.method = HTTP_METHOD_GET,
};
esp_http_client_handle_t client = esp_http_client_init(&config);
esp_http_client_set_header(client, "Authorization", auth_header);
esp_err_t err = esp_http_client_perform(client);
if (err == ESP_OK) {
ESP_LOGI(TAG, "Status = %d, Content Length = %d",
esp_http_client_get_status_code(client),
esp_http_client_get_content_length(client));
} else {
ESP_LOGE(TAG, "Request failed: %s", esp_err_to_name(err));
}
esp_http_client_cleanup(client);
vTaskDelete(NULL);
}
// WiFi 事件处理
static void wifi_event_handler(void *arg, esp_event_base_t event_base,
int32_t event_id, void *event_data) {
if (event_id == WIFI_EVENT_STA_START) {
esp_wifi_connect();
} else if (event_id == IP_EVENT_STA_GOT_IP) {
xTaskCreate(http_client_task, "http_client_task", 4096, NULL, 5, NULL);
}
}
// 初始化 WiFi
static void wifi_init_sta() {
esp_netif_init();
esp_event_loop_create_default();
esp_netif_create_default_wifi_sta();
wifi_init_config_t cfg = WIFI_INIT_CONFIG_DEFAULT();
esp_wifi_init(&cfg);
esp_event_handler_register(WIFI_EVENT, ESP_EVENT_ANY_ID, &wifi_event_handler, NULL);
esp_event_handler_register(IP_EVENT, IP_EVENT_STA_GOT_IP, &wifi_event_handler, NULL);
wifi_config_t wifi_config = {
.sta = {
.ssid = WIFI_SSID,
.password = WIFI_PASS,
.threshold.authmode = WIFI_AUTH_WPA2_PSK
}
};
esp_wifi_set_mode(WIFI_MODE_STA);
esp_wifi_set_config(WIFI_IF_STA, &wifi_config);
esp_wifi_start();
}
void app_main() {
nvs_flash_init();
wifi_init_sta();
}
说明
配置 WiFi 信息 替换代码中的 YOUR_SSID、YOUR_PASSWORD 和 SERVER_IP。
部署服务器和客户端
-
服务器代码:运行在提供资源的 ESP32 上。
-
客户端代码:运行在需要访问资源的 ESP32 上。
验证流程
-
客户端首次请求会收到 401,随后携带认证头重新请求。
-
服务器验证通过后返回资源,否则返回 403。
通过上述代码,ESP32 可实现完整的 HTTP 基本认证流程,适用于 IoT 设备的安全通信场景。


评论前必须登录!
注册