 网硕互联帮助中心
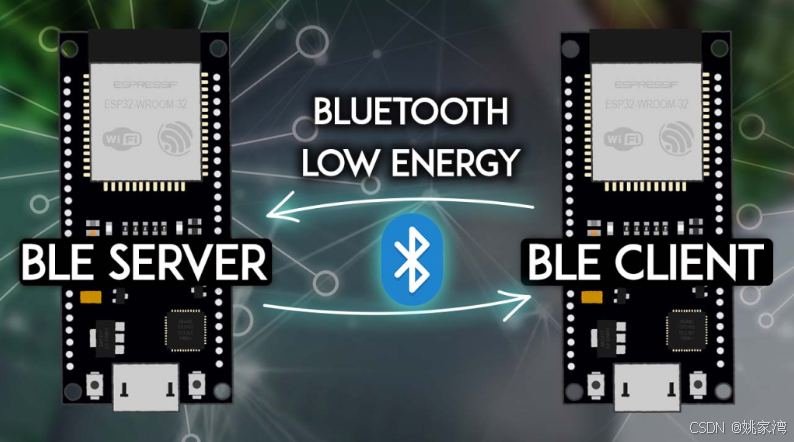
蓝牙通信在设计小型智能设备时非常普遍,之前一直没有使用过,最近使用ardunio ESP32 做了一些实验,做了一个收听播客的智能旋钮(Smart Knob),它带有一个旋转编码器和两个按键。
本文介绍BLE 服务器Server和Web BLE API 作为Client。的程序
BLE 服务器和客户端
使用蓝牙低功耗,有两种类型的设备:服务器和客户端。
服务器 宣传它的存在,因此它可以被其他设备发现并包含客户端 可以读取的数据。客户端扫描附近的设备,当它找到它正在寻找的服务器时,它会建立连接并监听传入的数据。这称为点对点通信。
2. GATT 协议
GATT (Generic Attribute Profile) 代表通用属性,它定义了向连接的 BLE 设备公开的分层数据结构。这意味着 GATT 定义了两个 BLE 设备发送和接收标准消息的方式。

服务集合 Profile: 针对特定用例的标准服务集合;服务 Service: 收集相关信息,如传感器读数、电池电量、心率等;特征 Characteristic: 它是实际数据保存在层次结构(值)上的位置;描述 Descriptor: 关于数据的元数据;属性 Properties: 描述如何与特征值交互。例如:读、写、通知、广播、指示等。
UUID
每个服务 、特征和描述符都有一个 UUID(通用唯一标识符。UUID 是唯一的 128 位(16 字节)数字。
ardunio 代码(1)
使用两个charactic
/*
Based on Neil Kolban example for IDF: https://github.com/nkolban/esp32-snippets/blob/master/cpp_utils/tests/BLE%20Tests/SampleServer.cpp
Ported to Arduino ESP32 by Evandro Copercini
updates by chegewara
*/
#include <BLEDevice.h>
#include <BLEUtils.h>
#include <BLEServer.h>
// See the following for generating UUIDs:
// https://www.uuidgenerator.net/
#define SERVICE_UUID "4fafc201-1fb5-459e-8fcc-c5c9c331914b"
#define CHARACTERISTIC_UUID_1 "beb5483e-36e1-4688-b7f5-ea07361b26a8"
#define CHARACTERISTIC_UUID_2 "cba1d466-344c-4be3-ab3f-189f80dd7518"
bool deviceConnected = false;
//创建一个旋钮属性
BLECharacteristic KnobCharacteristic(
CHARACTERISTIC_UUID_1,
BLECharacteristic::PROPERTY_READ |
BLECharacteristic::PROPERTY_WRITE |
BLECharacteristic::PROPERTY_NOTIFY |
BLECharacteristic::PROPERTY_INDICATE
);
BLEDescriptor KnobDescriptor(BLEUUID((uint16_t)0x2902));
//创建一个开关(Button)
BLECharacteristic ButtonCharacteristic(
CHARACTERISTIC_UUID_2,
BLECharacteristic::PROPERTY_READ |
BLECharacteristic::PROPERTY_WRITE |
BLECharacteristic::PROPERTY_NOTIFY |
BLECharacteristic::PROPERTY_INDICATE
);
BLEDescriptor ButtonDescriptor(BLEUUID((uint16_t)0x2903));
int KnobValue =100;
int ButtonValue=1;
class MyServerCallbacks: public BLEServerCallbacks {
void onConnect(BLEServer* pServer) {
deviceConnected = true;// 客户端连接到服务器,状态为true
};
void onDisconnect(BLEServer* pServer) {
deviceConnected = false;
}
};
void setup() {
Serial.begin(115200);
Serial.println("Starting BLE work!");
BLEDevice::init("ESP32_KNOB");
BLEServer *pServer = BLEDevice::createServer();
// 将 BLE 设备设置为服务器并分配回调函数
pServer->setCallbacks(new MyServerCallbacks());
BLEService *pService = pServer->createService(SERVICE_UUID);
//Knob
pService->addCharacteristic(&KnobCharacteristic);
KnobDescriptor.setValue("Knob");
KnobCharacteristic.addDescriptor(&KnobDescriptor);
pService->addCharacteristic(&ButtonCharacteristic);
ButtonDescriptor.setValue("Button");
ButtonCharacteristic.addDescriptor(&ButtonDescriptor);
pService->start();
// BLEAdvertising *pAdvertising = pServer->getAdvertising(); // this still is working for backward compatibility
BLEAdvertising *pAdvertising = BLEDevice::getAdvertising();
pAdvertising->addServiceUUID(SERVICE_UUID);
pAdvertising->setScanResponse(true);
pAdvertising->setMinPreferred(0x06); // functions that help with iPhone connections issue
pAdvertising->setMinPreferred(0x12);
BLEDevice::startAdvertising();
Serial.println("Characteristic defined! Now you can read it in your phone!");
}
void loop() {
KnobValue++;
ButtonValue++;
if (deviceConnected) {
String KnobStr=String(KnobValue);
String ButtonStr=String(ButtonValue);
KnobCharacteristic.setValue(KnobStr.c_str());
KnobCharacteristic.notify();
ButtonCharacteristic.setValue(ButtonStr.c_str());
ButtonCharacteristic.notify();
}
delay(50);
}
adunio代码(2)
在测试的时候发现,Notify 两个Caractic时候,Web Bluetooth ,只能接收到第一个notify,第二个value 始终为空,于是我使用一个charactic 传送两个参数。
另外,在loop 中增加 startAdvertising 的程序,保证在断开时不断地startAdvertising.web 能够扫描到BLE Server。
if (!deviceConnected && oldDeviceConnected) {
Serial.println("Device disconnected.");
delay(500);
pServer->startAdvertising(); // restart advertising
Serial.println("Start advertising");
oldDeviceConnected = deviceConnected;
}
// connecting
if (deviceConnected && !oldDeviceConnected) {
// do stuff here on connecting
oldDeviceConnected = deviceConnected;
Serial.println("Device Connected");
}
/*
Based on Neil Kolban example for IDF: https://github.com/nkolban/esp32-snippets/blob/master/cpp_utils/tests/BLE%20Tests/SampleServer.cpp
Ported to Arduino ESP32 by Evandro Copercini
updates by chegewara
*/
#include <BLEDevice.h>
#include <BLEUtils.h>
#include <BLEServer.h>
// See the following for generating UUIDs:
// https://www.uuidgenerator.net/
#define SERVICE_UUID "4fafc201-1fb5-459e-8fcc-c5c9c331914b"
#define CHARACTERISTIC_UUID_1 "beb5483e-36e1-4688-b7f5-ea07361b26a8"
BLEServer* pServer = NULL;
bool deviceConnected = false;
bool oldDeviceConnected = false;
//创建一个旋钮属性
BLECharacteristic KnobCharacteristic(
CHARACTERISTIC_UUID_1,
BLECharacteristic::PROPERTY_READ |
BLECharacteristic::PROPERTY_WRITE |
BLECharacteristic::PROPERTY_NOTIFY |
BLECharacteristic::PROPERTY_INDICATE
);
BLEDescriptor KnobDescriptor(BLEUUID((uint16_t)0x2902));
int KnobValue =100;
int ButtonValue=1;
class MyServerCallbacks: public BLEServerCallbacks {
void onConnect(BLEServer* pServer) {
deviceConnected = true;// 客户端连接到服务器,状态为true
};
void onDisconnect(BLEServer* pServer) {
deviceConnected = false;
}
};
void setup() {
Serial.begin(115200);
Serial.println("Starting BLE work!");
BLEDevice::init("ESP32_KNOB");
pServer = BLEDevice::createServer();
// 将 BLE 设备设置为服务器并分配回调函数
pServer->setCallbacks(new MyServerCallbacks());
BLEService *pService = pServer->createService(SERVICE_UUID);
//Knob
pService->addCharacteristic(&KnobCharacteristic);
KnobDescriptor.setValue("Knob");
KnobCharacteristic.addDescriptor(&KnobDescriptor);
pService->start();
BLEAdvertising *pAdvertising = BLEDevice::getAdvertising();
pAdvertising->addServiceUUID(SERVICE_UUID);
pAdvertising->setScanResponse(true);
pAdvertising->setMinPreferred(0x06); // functions that help with iPhone connections issue
pAdvertising->setMinPreferred(0x12);
// BLEDevice::startAdvertising();
pServer->getAdvertising()->start();
Serial.println("Characteristic defined! Now you can read it in your phone!");
}
void loop() {
if (deviceConnected) {
KnobValue++;
ButtonValue++;
byte buffer[8];
memcpy(&buffer[0],&KnobValue,4);
memcpy(&buffer[4],&ButtonValue,4);
// String KnobStr=String(KnobValue);
// String ButtonStr=String(ButtonValue);
KnobCharacteristic.setValue((uint8_t*)&buffer, 8);
KnobCharacteristic.notify();
delay(500);
}
// disconnecting
if (!deviceConnected && oldDeviceConnected) {
Serial.println("Device disconnected.");
delay(500);
pServer->startAdvertising(); // restart advertising
Serial.println("Start advertising");
oldDeviceConnected = deviceConnected;
}
// connecting
if (deviceConnected && !oldDeviceConnected) {
// do stuff here on connecting
oldDeviceConnected = deviceConnected;
Serial.println("Device Connected");
}
delay(200);
}
通过web 访问蓝牙
为了简单地做测试,我使用Web BlueTooth 的API 。
连接到设备
从浏览器连接到设备。可以调用函数 navigator.bluetooth.requestDevice() 并为函数提供配置对象,该对象含有关我们要使用哪个设备,以及都有哪些服务可用的信息。
let device = await navigator.bluetooth.requestDevice({
filters: [
{ namePrefix: 'PLAYBULB' }
],
optionalServices: [ 0xff0f ]
});
当我们调用此函数时,会弹出一个窗口,显示符合过滤规则的设备列表。 现在必须手动选择我们想要连接的设备。这是出于安全和隐私的需要,并为用户提供控制的权利。用户决定是否允许 Web 应用连接到设备,当然还有已经被允许连接的设备。 如果没有用户手动选择设备,Web 应用则无法获取设备列表或连接。
在我们访问设备之后,可以通过调用设备 gatt 属性上的 connect() 函数连接到 GATT 服务器并等待返回结果。
let server = await device.gatt.connect();
一旦我们连上服务器,就可以调用 getPrimaryService() 并传递服务的UUID,然后等待结果返回。
let service = await server.getPrimaryService(0xff0f);
然后使用特性的UUID作为参数调用服务上的 getCharacteristic() 并再次等待结果返回。
现在就得到了可用于读写数据的特性:
let characteristic = await service.getCharacteristic(0xfffc);
写数据
要写入数据,我们可以在特性上调用函数 writeValue() ,以 ArrayBuffer 的形式传递想要写入的值 ,这是二进制数据的存储方法。
characteristic.writeValue(
new Uint8Array([ 0, r, g, b ])
);
读数据
要读取灯泡的当前颜色,可以使用 readValue() 函数并等待结果返回。
let value = await characteristic.readValue();
let r = value.getUint8(1);
let g = value.getUint8(2);
let b = value.getUint8(3);
获得通知变更
最后,还有一种方法可以在设备值发生变化时收到通知。
characteristic.addEventListener(
'characteristicvaluechanged', e => {
let r = e.target.value.getUint8(1);
let g = e.target.value.getUint8(2);
let b = e.target.value.getUint8(3);
}
);
characteristic.startNotifications();
简单的方式
async function onButtonClick() {
let device = await navigator.bluetooth.requestDevice({
acceptAllDevices: true,
});
let server = await device.gatt.connect();
console.log(server);
let services = await server.getPrimaryServices();
console.log(services);
let characteristics = await services[0].getCharacteristics();
let value = await characteristics[0].readValue();
console.log(value);
}
代码(读取方式)
<!DOCTYPE html>
<html lang="en">
<head>
<meta charset="utf-8">
<meta name="viewport" content="width=device-width, initial-scale=1.0">
<title>BLE Server </title>
</head>
<body>
<h1> Ble Server Connection</h1>
<button onclick="Connection()">连接</button>
<button onclick="ReadOut()">读操作</button>
<p id="Knob">Knob:null</p>
<p id="button">button:null</p>
<script>
var server
var services
async function ReadOut() {
let characteristics = await services[0].getCharacteristics();
let value = await characteristics[0].readValue();
let textDecoder = new TextDecoder('ascii');
let Val = textDecoder.decode(value.buffer);
console.log("Knob:" + Val);
document.getElementById("Knob").textContent="knob:"+Val
value = await characteristics[1].readValue();
textDecoder = new TextDecoder('ascii');
Val = textDecoder.decode(value.buffer);
console.log("button:" + Val);
document.getElementById("button").textContent="button:"+Val
}
async function Connection() {
let device = await navigator.bluetooth.requestDevice({
filters: [
{ name: 'ESP32_KNOB' }
]
});
server = await device.gatt.connect();
services = await server.getPrimaryServices();
}
</script>
</body>
</html>
代码(使用Notify)
<!DOCTYPE html>
<html lang="en">
<head>
<meta charset="utf-8">
<meta name="viewport" content="width=device-width, initial-scale=1.0">
<title>BLE Server </title>
</head>
<body>
<h1> Ble Server Connection</h1>
<button onclick="Connection()">连接</button>
<h4>Parameters</h4>
<p id="Knob">Knob:null</p>
<p id="button">button:null</p>
<script>
var server
var services
async function startNotification() {
let textDecoder = new TextDecoder('ascii');
let characteristics= await services[0].getCharacteristics()
let characteristic = await services[0].getCharacteristic("beb5483e-36e1-4688-b7f5-ea07361b26a8");
characteristic.addEventListener(
'characteristicvaluechanged', e => {
v1=e.target.value.getUint8(0);
v2=e.target.value.getUint8(1);
v3=e.target.value.getUint8(2);
v4=e.target.value.getUint8(3);
Val=(v4<<24)|(v3<<16)|(v2<<8)|v1
console.log("Knob:" + Val);
document.getElementById("Knob").textContent = "knob:" + Val
//
v1=e.target.value.getUint8(4);
v2=e.target.value.getUint8(5);
v3=e.target.value.getUint8(6);
v4=e.target.value.getUint8(7);
Val=(v4<<24)|(v3<<16)|(v2<<8)|v1
console.log("button:" + Val);
document.getElementById("button").textContent = "button:" + Val
}
);
characteristic.startNotifications();
}
async function Connection() {
let device = await navigator.bluetooth.requestDevice({
filters: [
{ name: 'ESP32_KNOB' }
],
optionalServices: [ "4fafc201-1fb5-459e-8fcc-c5c9c331914b"]
});
server = await device.gatt.connect();
services = await server.getPrimaryServices();
startNotification()
}
</script>
</body>
</html>
结论
本文已经覆盖了 WebBluetooth API 的90%。 只需调用几个函数并发送 4 个字节,你就可以创建一个控制灯泡颜色的 Web 应用。 如果再添加几行,你甚至可以控制玩具车或驾驶无人机。 随着越来越多的蓝牙设备进入市场,将产生无穷的可能性。
更多资源
- Bluetooth.rocks! Demos | (GitHub 上的源代码)
- “Web Bluetooth Specification,” Web蓝牙社区
- Open GATT Registry 蓝牙低功耗设备的GATT非官方文档。
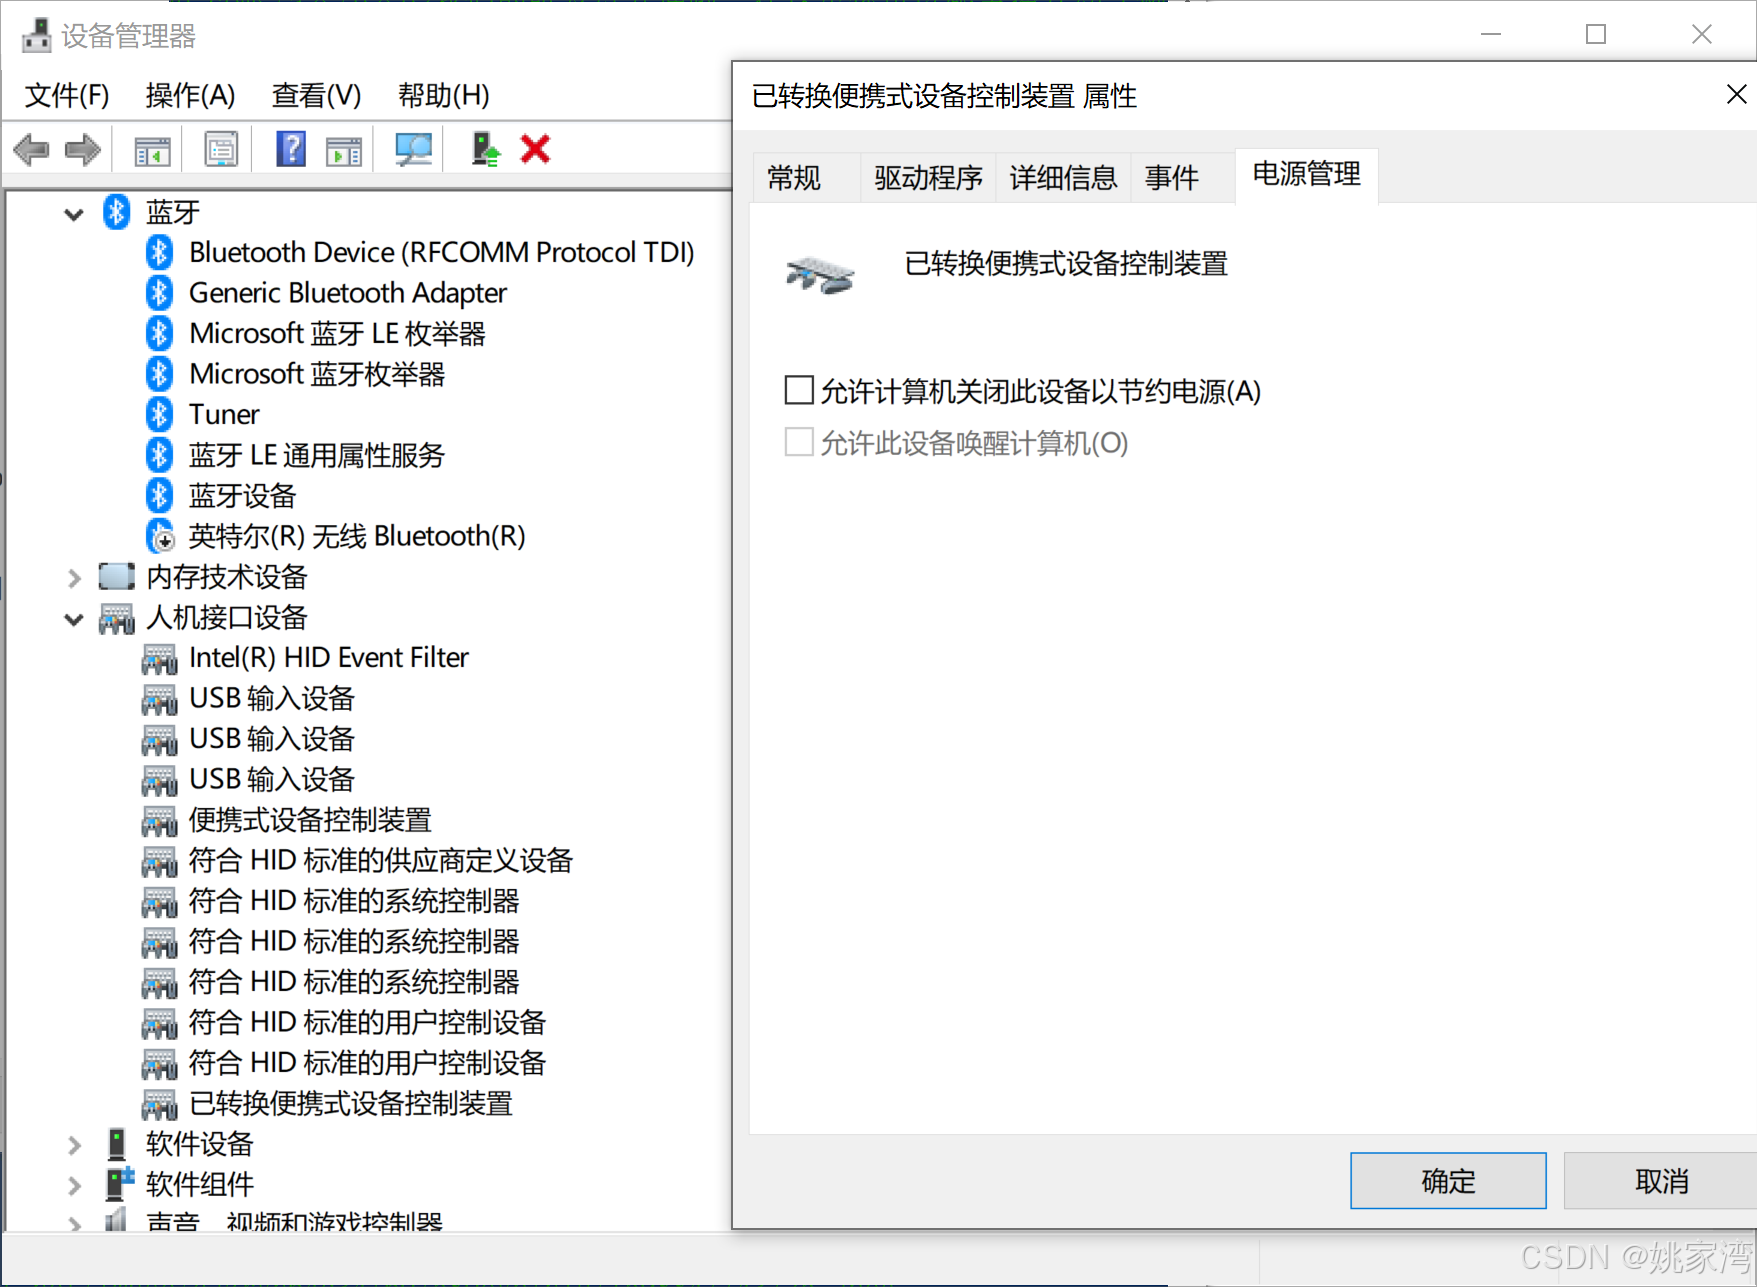
省电问题请看DELL 公司的文章
更改 Windows 10 中的蓝牙电源管理设置


评论前必须登录!
注册