 网硕互联帮助中心
目录
前言
什么是定时器
JAVA标准库中的定时器
而关于sched方法,请看源码:
为什么我们能知道"notify() 唤醒后台线程 TimerThread"?
TimerThread 关键逻辑
第一步:加锁 queue,看有没有任务
第二步:取出最近要执行的任务
第三步:看任务能不能执行
第四步: 判断任务是否是周期性的
第五步: 执行
举个例子,请看代码:
实现一个简单定时器
结尾
前言
在现代软件开发中,多线程编程能力已经成为程序员必须掌握的一项核心技能。随着计算机硬件的不断升级,单核CPU早已无法满足复杂应用的性能需求,多核并行运算已成为主流。而多线程正是实现资源最大化利用、任务高效并行执行的基础手段。
而本博客是笔者多线程编程的第五篇博客! 前面四篇都在下面的URL中,希望能得到大佬们的阅读和指点!!!
多线程编程_callJJ的博客-CSDN博客
本期我们介绍的是定时器,然后翻看并且介绍它的源码,以及如何简单的实现一个定时器,并通过它的简单实现提高我们对于多线程编程的理解,废话不多说,让我们正式开始博客内容!
什么是定时器
在实现定时器之前,我们还是 要先介绍一下什么是定时器
简单来说,定时器(Timer)就是一种允许程序在指定时间后或者每隔一段时间周期性地执行某个任务的机制。它的主要作用是延迟执行或者定时重复执行操作。
在实际开发中,它的用处也很广泛,例如:
-
界面动画的刷新
-
游戏中定时生成怪物
-
服务端每隔一段时间清理缓存
-
定时发送心跳包检测连接是否存活
-
定时备份文件系统数据等
举个例子,他就好像是生活中的闹钟,设定达到一个时间以后,就执行某些指定好的代码!
JAVA标准库中的定时器
Java 标准库里最早提供的定时器就是 java.util.Timer,搭配 java.util.TimerTask 使用。它的核心设计思路非常直接:
1.Timer 本质上是一个单线程的任务调度器,它内部维护一个线程,不断地检查任务队列中下一个要执行的任务时间。它的核心方法为 schedule
它包含两个参数,第一个参数是指定需要执行的任务代码,第二个指令是延长多少 ms
2. TimerTask 则是你要执行的具体任务,需要继承这个抽象类并重写 run() 方法。
我们可以翻看它们的源码略知一二:
public void schedule(TimerTask task, long delay) {
if (delay < 0)
throw new IllegalArgumentException("Negative delay.");
sched(task, System.currentTimeMillis()+delay, 0);
}
在主线程中调用 Timer.schedule(TimerTask task, long delay),表示安排一个任务在指定延迟后执行。 这一调用并不会直接执行 task.run(),而是内部调用 sched() 方法,将任务添加到 Timer 的任务队列中。
并且可以看到,schedule方法需要一个 TimerTask对象.
而我们的 TimerTask 是一个继承了 Runnable 接口的 抽象类,所以为了实例化TimerTask,需要重写 run()方法
public abstract class TimerTask implements Runnable
而关于sched方法,请看源码:
private void sched(TimerTask task, long time, long period) {
if (time < 0)
throw new IllegalArgumentException("Illegal execution time.");
// Constrain value of period sufficiently to prevent numeric
// overflow while still being effectively infinitely large.
if (Math.abs(period) > (Long.MAX_VALUE >> 1))
period >>= 1;
synchronized(queue) {
if (!thread.newTasksMayBeScheduled)
throw new IllegalStateException("Timer already cancelled.");
synchronized(task.lock) {
if (task.state != TimerTask.VIRGIN)
throw new IllegalStateException(
"Task already scheduled or cancelled");
task.nextExecutionTime = time;
task.period = period;
task.state = TimerTask.SCHEDULED;
}
queue.add(task);
if (queue.getMin() == task)
queue.notify();
}
}
sched() 方法负责:
-
先计算出任务的下次执行时间。
-
然后将 TimerTask 插入到 PriorityQueue(优先队列)中,按时间排序。
-
最后调用 notify() 唤醒后台线程 TimerThread,让它知道有新任务要处理。
为什么我们能知道"notify() 唤醒后台线程 TimerThread"?
请看 TimerThread 中的代码
private void mainLoop() {
while (true) {
try {
TimerTask task;
boolean taskFired;
synchronized(queue) {
// Wait for queue to become non-empty
while (queue.isEmpty() && newTasksMayBeScheduled)
queue.wait();
if (queue.isEmpty())
break; // Queue is empty and will forever remain; die
// Queue nonempty; look at first evt and do the right thing
long currentTime, executionTime;
task = queue.getMin();
synchronized(task.lock) {
if (task.state == TimerTask.CANCELLED) {
queue.removeMin();
continue; // No action required, poll queue again
}
currentTime = System.currentTimeMillis();
executionTime = task.nextExecutionTime;
if (taskFired = (executionTime<=currentTime)) {
if (task.period == 0) { // Non-repeating, remove
queue.removeMin();
task.state = TimerTask.EXECUTED;
} else { // Repeating task, reschedule
queue.rescheduleMin(
task.period<0 ? currentTime – task.period
: executionTime + task.period);
}
}
}
if (!taskFired) // Task hasn't yet fired; wait
queue.wait(executionTime – currentTime);
}
if (taskFired) // Task fired; run it, holding no locks
task.run();
} catch(InterruptedException e) {
}
}
}
你对比一下 sched() 方法 的代码就会发现,它们有同一个加锁对象—— queue.
如果queue是空的(即当前没有定时任务),并且newTasksMayBeScheduled == true(即允许继续添加新任务),那么当前 TimerThread 就在 queue 上调用 wait(),挂起自己,等待新的任务到来。
这与前面的 notify()方法遥相呼应
以下是完善流程:
main线程:
Timer.schedule(task, delay)
-> sched(task, 时间, 周期)
-> queue.add(task)
-> queue.notify()
后台线程(TimerThread):
run() -> mainLoop()
-> 等待任务
-> 到了执行时间
-> 调用 task.run()
TimerThread 关键逻辑
那么, TimerThread 关键逻辑 是什么呢?它是怎么一步一步的成功调用 run() 的呢?
第一步:加锁 queue,看有没有任务
synchronized(queue) {
while (queue.isEmpty() && newTasksMayBeScheduled)
queue.wait();
if (queue.isEmpty())
break;
}
-
如果没有任务,就 wait 挂起等待。
-
如果醒来后发现还是没任务且不允许加了,就 break 退出线程。
第二步:取出最近要执行的任务
task = queue.getMin();
-
getMin() 取出最早应该执行的那个任务(优先队列小顶堆)。
-
也就是当前最紧急的任务。
第三步:看任务能不能执行
if (task.state == TimerTask.CANCELLED) {
queue.removeMin();
continue;
}
如果发现任务被取消了,就从队列移除,继续循环。
然后得到目前的时间,判断能否执行
currentTime = System.currentTimeMillis();
executionTime = task.nextExecutionTime;
if (taskFired = (executionTime<=currentTime)) {
if (task.period == 0) { // Non-repeating, remove
queue.removeMin();
task.state = TimerTask.EXECUTED;
} else { // Repeating task, reschedule
queue.rescheduleMin(
task.period<0 ? currentTime – task.period
: executionTime + task.period);
}
}
设置 标志位 taskFired
executionTime <= currentTime 判断任务的执行时间是否已经到达当前时间。如果到达执行时间,taskFired 被设为 true,表示任务可以执行。如果没有到达执行时间,taskFired 会被设为false,表示任务不能执行,应该等待。
第四步: 判断任务是否是周期性的
如果这个任务是非周期性质的
if (task.period == 0) { // Non-repeating, remove
queue.removeMin(); // 从队列中移除任务
task.state = TimerTask.EXECUTED; // 将任务状态标记为已执行
}
就把状态设置为 TimerTask.EXECUTED
如果任务是周期性的
else {
queue.rescheduleMin(
task.period < 0 ? currentTime – task.period
: executionTime + task.period
);
}
1.task.period != 0 表示任务是周期性任务,即任务需要执行多次。
2.task.period < 0 表示周期性任务的周期是负数。在这种情况下,task.period 表示的是一个相对时间间隔,应该根据当前时间来计算新的执行时间。所以 currentTime – task.period 是计算任务的下次执行时间。
3.否则,executionTime + task.period 表示任务的下次执行时间是基于上一次的执行时间加上一个固定的周期。
以上的这些步骤都是要加锁的,保证原子性
第五步: 执行
如果 taskFired == true , 那么就执行程序
if (taskFired) // Task fired; run it, holding no locks
task.run();
我们小小总结一下吧
在 Java 中,可以通过 Timer 类提供定时器功能。具体来说,定时器的实现主要依赖于调用 schedule() 方法。
schedule() 方法需要传入两个参数:第一个参数是一个实例化的 TimerTask 对象(TimerTask 是一个抽象类,并且实现了 Runnable 接口,需要重写 run() 方法),第二个参数是一个 long delay,表示任务延迟多少毫秒后执行。
在 schedule() 方法内部,只要传入的 delay 参数没有问题(不会抛出异常),方法就会调用内部的 sched() 方法,将任务加入到一个优先队列中。同时,唤醒后台线程 TimerThread 的 mainLoop(),由它不断检查任务是否到达执行时间,一旦到达,就调用任务的 run() 方法,最终实现定时器效果。
举个例子,请看代码:
import java.util.Timer;
import java.util.TimerTask;
// 定时器
public class Demo
{
public static void main(String[] args) {
Timer timer = new Timer();
timer.schedule(new TimerTask() {
@Override
public void run() {
System.out.println("2000");
}
},2000);
System.out.println("主线程开始跑");
}
}
import java.util.Timer;
import java.util.TimerTask;
// 定时器
class Mytimertask extends TimerTask
{
@Override
public void run() {
System.out.println("2000");
}
}
public class Demo
{
public static void main(String[] args) {
Timer timer = new Timer();
Mytimertask mytimertask = new Mytimertask();
timer.schedule(mytimertask,2000);
System.out.println("主线程开始跑");
}
}
我们分别通过实现匿名内部类和实现子类的方法创建了一个 TimerTask 对象,实现了schedule方法
效果如下:
首先打印"主线程开始跑",过了两秒以后打印"2000"

以上就是定时器的源码简单介绍和简单举例
实现一个简单定时器
接下来我们自己动手实现一个简单定时器,通过上面的代码讲解我们也能看出来
我们需要实现一个 TimerTask , 一个 Timer. 然后手动实现schedule()方法 和 mainLoop() 方法
Timer 类
class MyTimerTask
{
public Runnable runnable;
public long time;
public MyTimerTask(Runnable runnable, long delay) {
this.runnable = runnable;
this.time = System.currentTimeMillis()+delay;
}
public Runnable getRunnable() {
return runnable;
}
public long getTime() {
return time;
}
}
为什么手动实现定时器时使用Runnable?
因为我们只需要它的run()方法,不需要别的,TimerTask 所提供的其他更高级的功能我们暂时不弄
TimerTask类
在构造方法中新创建一个线程对象
class MyTimer
{
PriorityQueue<MyTimerTask> priorityQueue = new PriorityQueue<>(new Comparator<MyTimerTask>() {
@Override
public int compare(MyTimerTask o1, MyTimerTask o2) {
return Long.compare(o1.time,o2.time);
}
});
Object locker = new Object();
public void schedule(Runnable runnable,long delay)
{
synchronized (locker)
{
priorityQueue.offer(new MyTimerTask(runnable,delay));
locker.notify();
}
}
public MyTimer()
{
Thread thread = new Thread(() -> {
while(true)
{
try {
synchronized (locker)
{
while(priorityQueue.isEmpty())
{
// 如果是空的就阻塞,直到唤醒
locker.wait();
}
MyTimerTask myTimerTask = priorityQueue.peek();
long now = System.currentTimeMillis();
if (now >= myTimerTask.getTime()) {
myTimerTask.getRunnable().run();
priorityQueue.poll();
} else {
locker.wait(myTimerTask.getTime() – now);
}
}
}
catch (InterruptedException e)
{
e.printStackTrace();
}
}
});
thread.start();
}
}
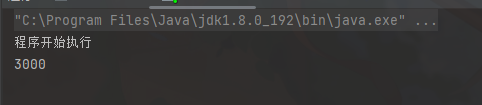
测试:
public class Demo18 {
public static void main(String[] args) {
MyTimer myTimer = new MyTimer();
myTimer.schedule(new Runnable() {
@Override
public void run() {
System.out.println(3000);
}
},3000);
// 1️⃣ 创建了一个匿名内部类,实现了 Runnable 接口。
// 2️⃣ 必须重写 run() 方法,否则接口没有具体执行内容。
System.out.println("程序开始执行");
}
}
结果如下:
结尾
又是写了很久的高质量博客,希望能对人有帮助吧,谢谢大家!!


![[Spring] Sentinel详解-网硕互联帮助中心](https://www.wsisp.com/helps/wp-content/uploads/2025/04/20250429011422-681027ee255b5-220x150.jpg)

评论前必须登录!
注册