 网硕互联帮助中心
个人服务器搭建教程
-
- 前言
- Part 1:光猫改桥接通过路由器拨号上网
-
- 一、 获取光猫超级管理员账号密码
- 二、 光猫改桥接模式
- 三、 开启IPV6
- Part 2:搭建服务器
-
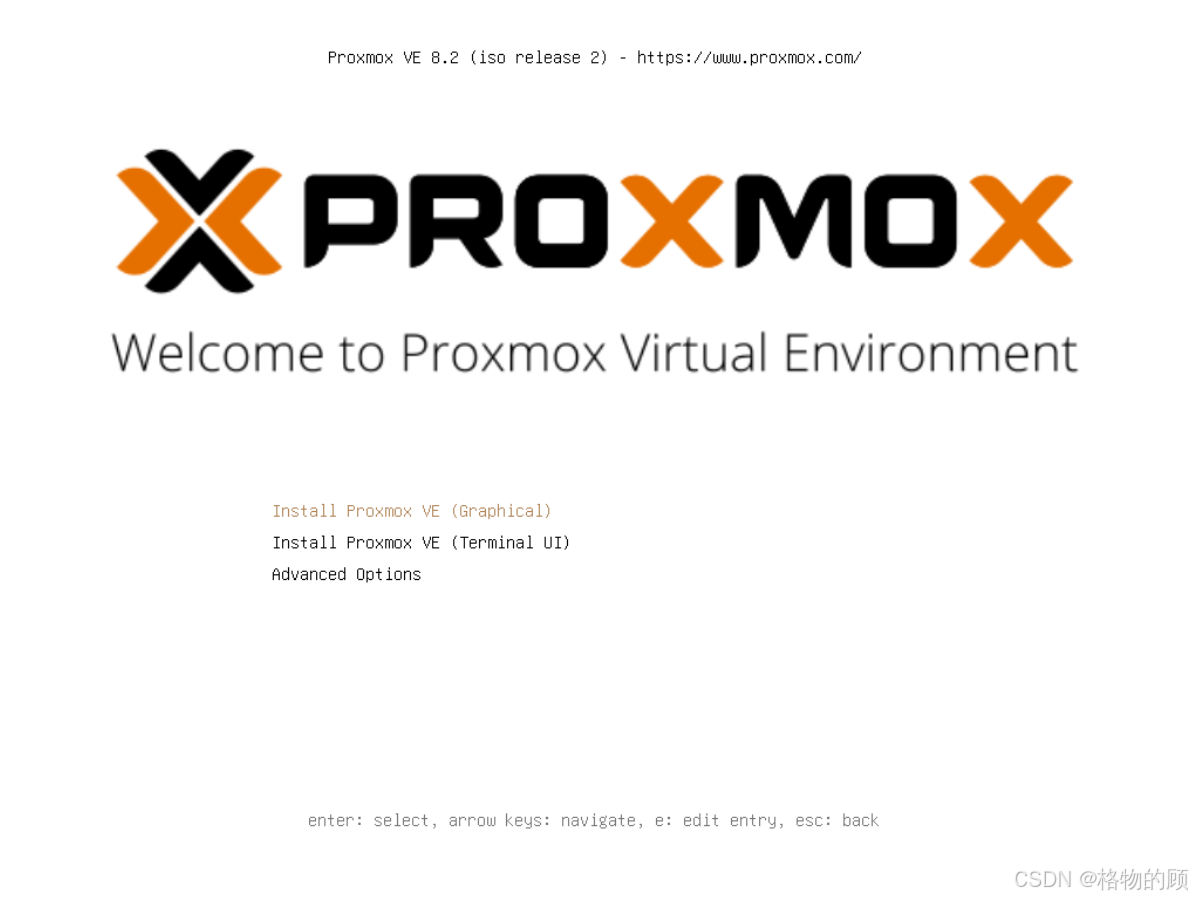
- 一、 制作PVE安装U盘
- 二、 给服务器安装PVE系统
- 三、 在PVE系统内安装Centos
- 四、 在PVE系统内安装Debian
- Part 3:各种疑难杂症
-
- CentOS 7 yum无法使用解决方法
- linux 磁盘扩容
-
-
- 方案一
- 方案二
-
- PVE设置IPv6
- PVE开启vGPU支持
前言
前段时间家里电脑更新换代,多余的零件刚好可以组一台主机出来,就想尝试着搭建一台公网可以访问的个人服务器。通过万能的互联网,查询了很多资料,尝试了N多方法后终于搭建成功。
以下是当前我所用到的硬件及网络环境,其他设备的小伙伴可以参考:
- 宽带:移动千兆?
- 光猫:移动家庭网关 H50G
- 路由器:TP-Link TL-R470GP-AC
- U盘:废物堆里翻出的2G金士顿
- 服务器主机:东拼西凑一台能正常开机的主机
Part 1:光猫改桥接通过路由器拨号上网
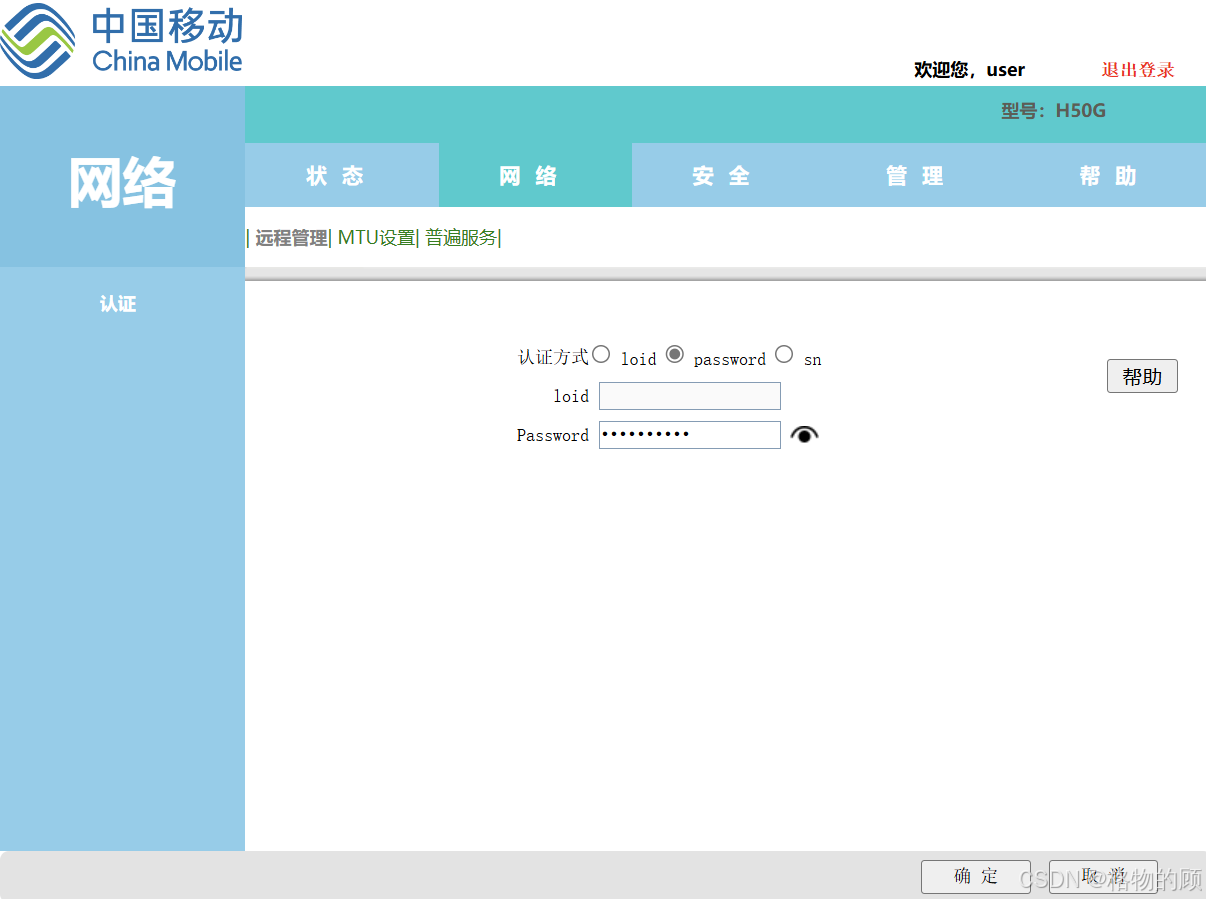
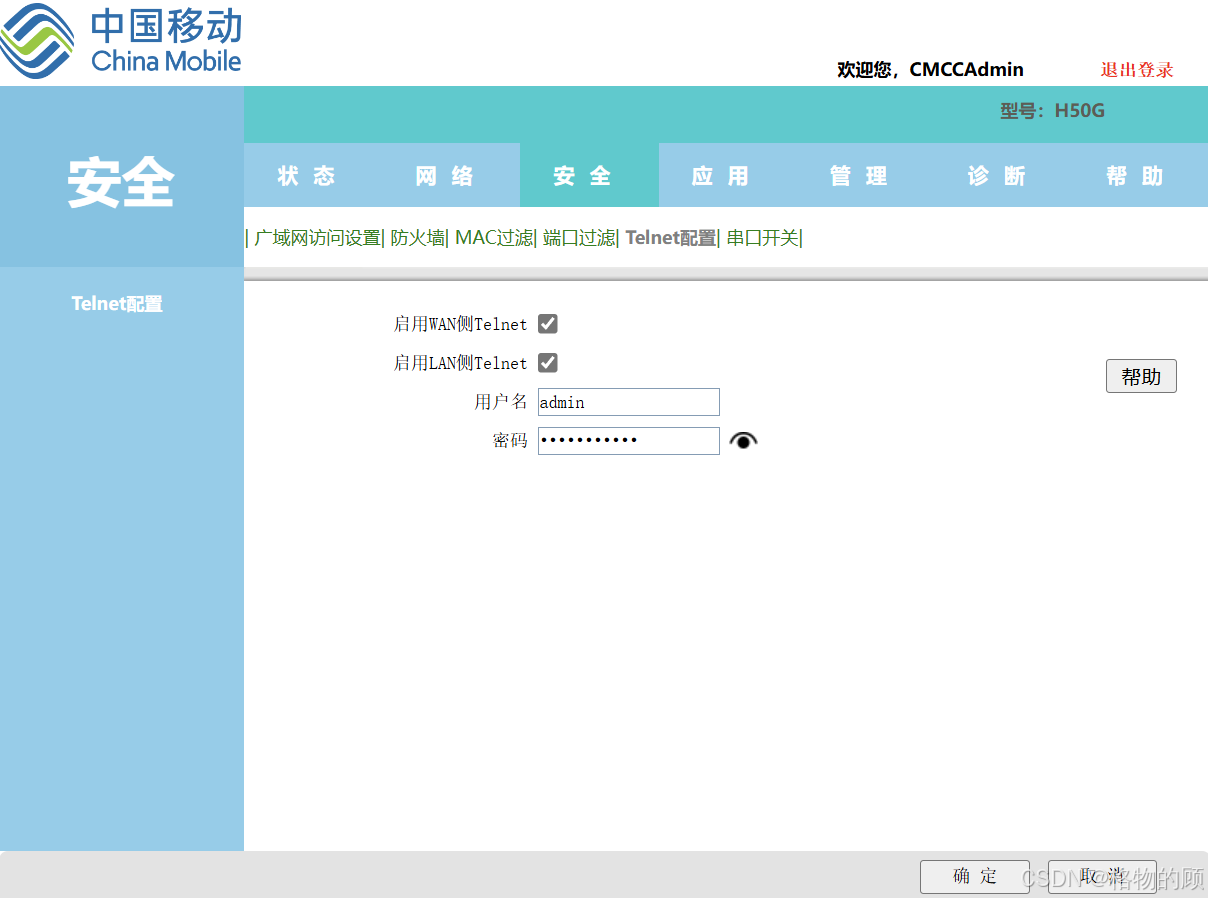
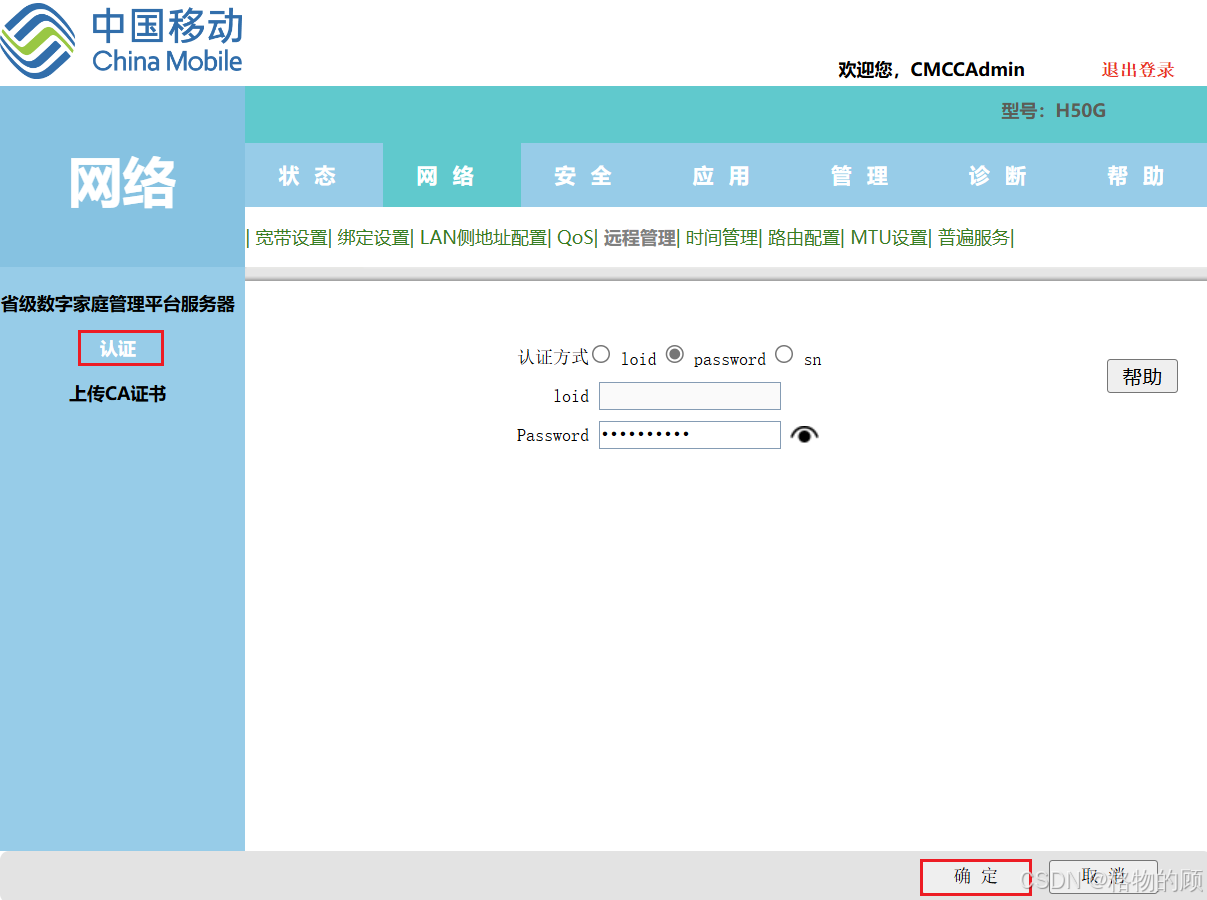
一、 获取光猫超级管理员账号密码
- 记录password值
- 勾选启用WAN侧Telnet
- 勾选启用LAN侧Telnet
- 记录用户名和密码
- 输入上面第3步记录的password值
- 点确认(等待下发数据完成)
- 下发数据完成后管理员密码变成随机了,用默认超级管理员肯定进不去
-
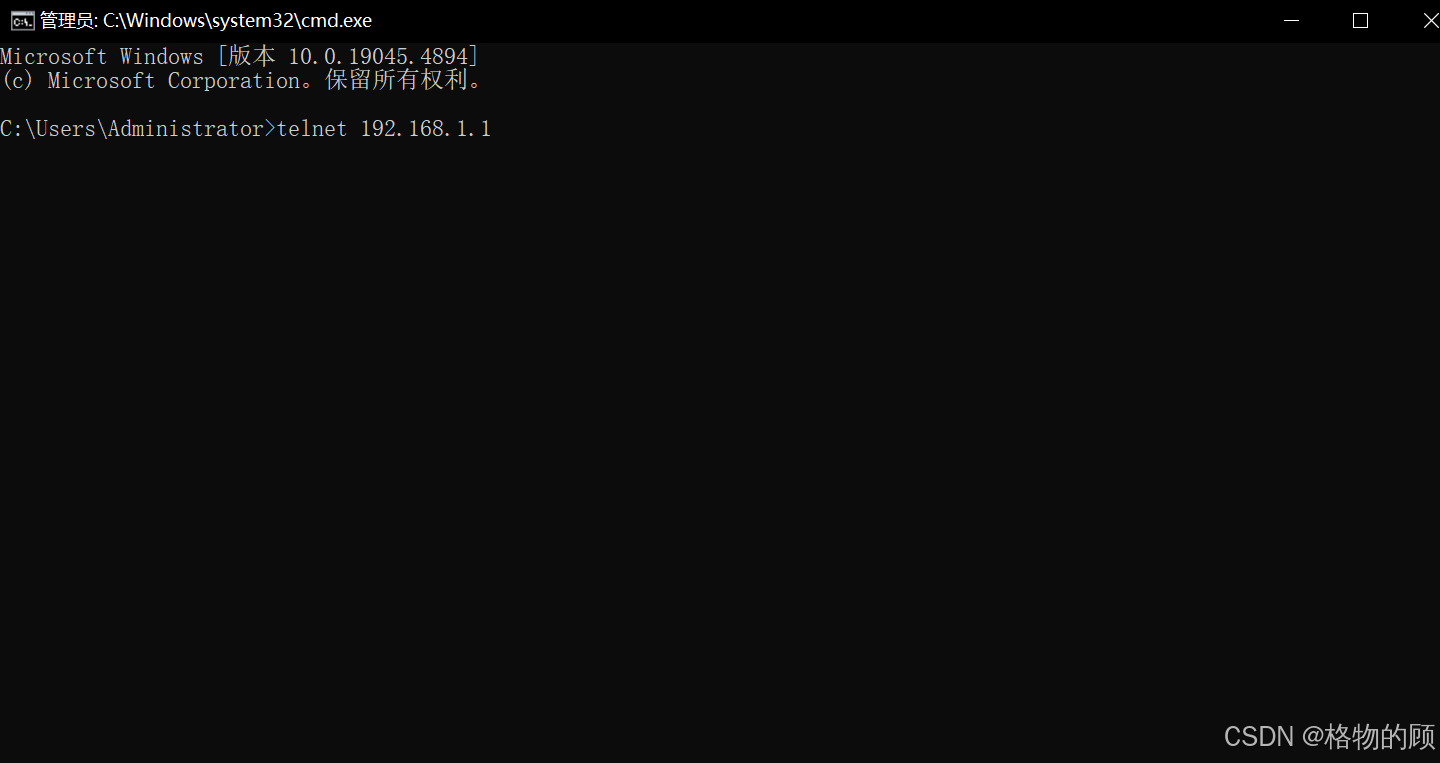
输入cmd↩︎

-
弹出命令行窗口输入:telnet 192.168.1.1↩︎
-
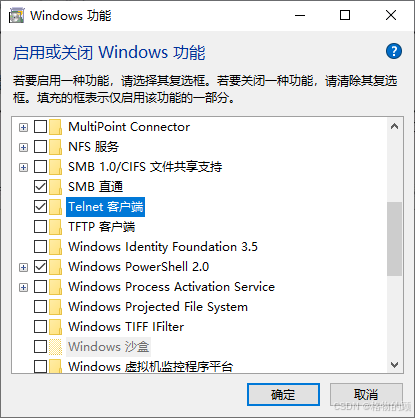
如果提示'telnet' 不是内部或外部命令,也不是可运行的程序或批处理文件。则需要先开启Telnet客户端(控制面板–>所有控制面板项–>程序和功能–>启用或关闭 Windows 功能–>勾选Telnet客户端–>确定–>等待安装完成)
-
输入上面第7步获取的Telnet用户名和密码登录

- 完成上一步Telnet客户端登录后,标识符变成~$了,接下来需要提权
- 输入su↩︎
- 输入密码aDm8H%MdA↩︎
- 当标识符变成/#时,说明提权成功
- 输入下面指令,会弹出一很多包括user、CMCCAdmin等账号,但是都是******,可以不用管sidbg 1 DB p DevAuthInfo
- 修改超级管理员账号 ( CMCCAdmin可自定义 )sidbg 1 DB set DevAuthInfo 0 User CMCCAdmin
- 修改超级管理员密码 (aDm8H%MdA可自定义 )sidbg 1 DB set DevAuthInfo 0 Pass aDm8H%MdA
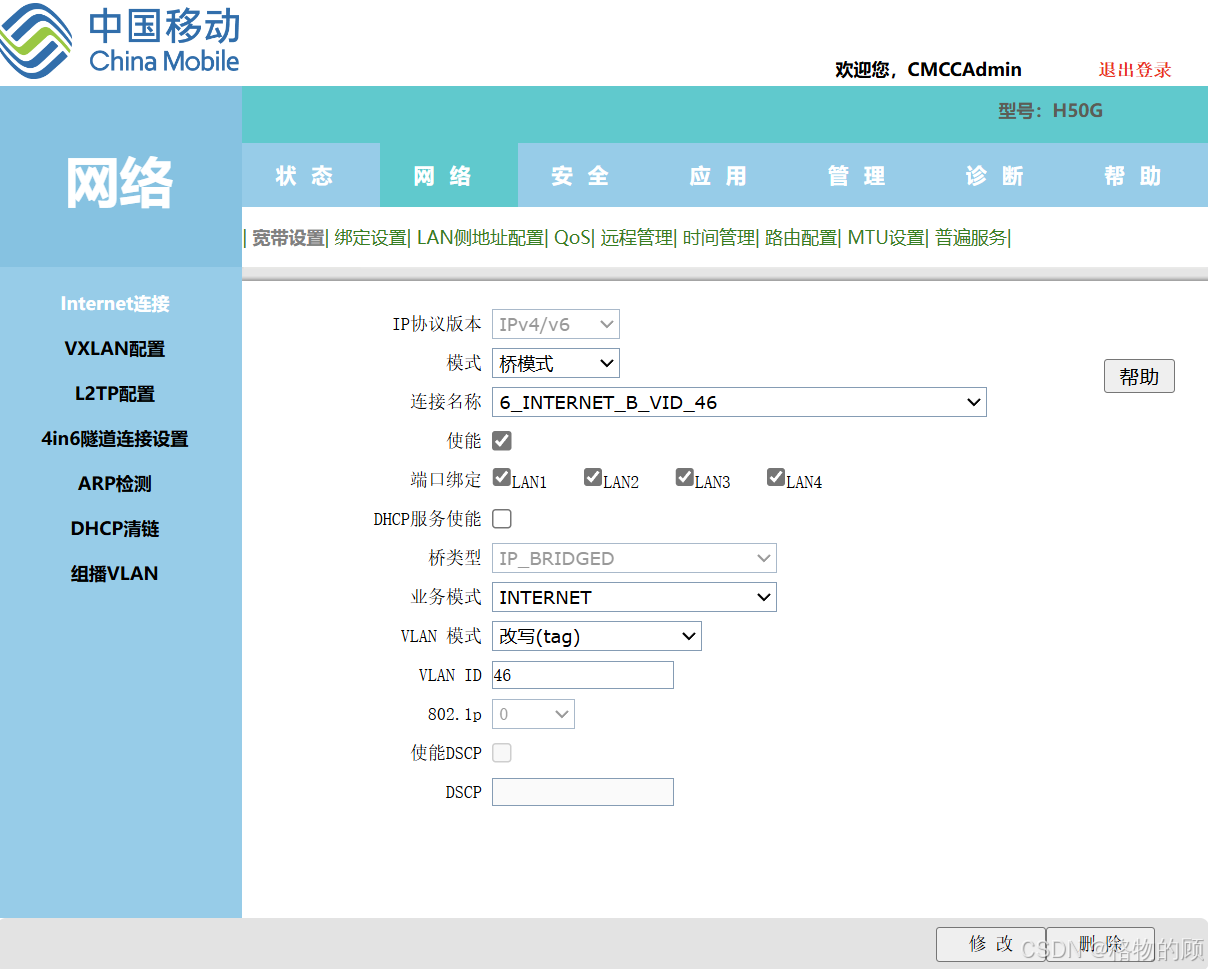
二、 光猫改桥接模式

- IP协议版本:IPv4/v6
- 模式:桥模式
- 使能:打勾
- 端口绑定:LAN 1234可以全打勾(意思是四个LAN全可以拨号)
- DHCP服务使能:去掉打勾
- 桥类型 :IP BRIDGE
- 业务模式:INTERNET
- VLAN 模式:改写(tag)
- VLAN ID:填写刚才记下的VLAN
- 点击修改
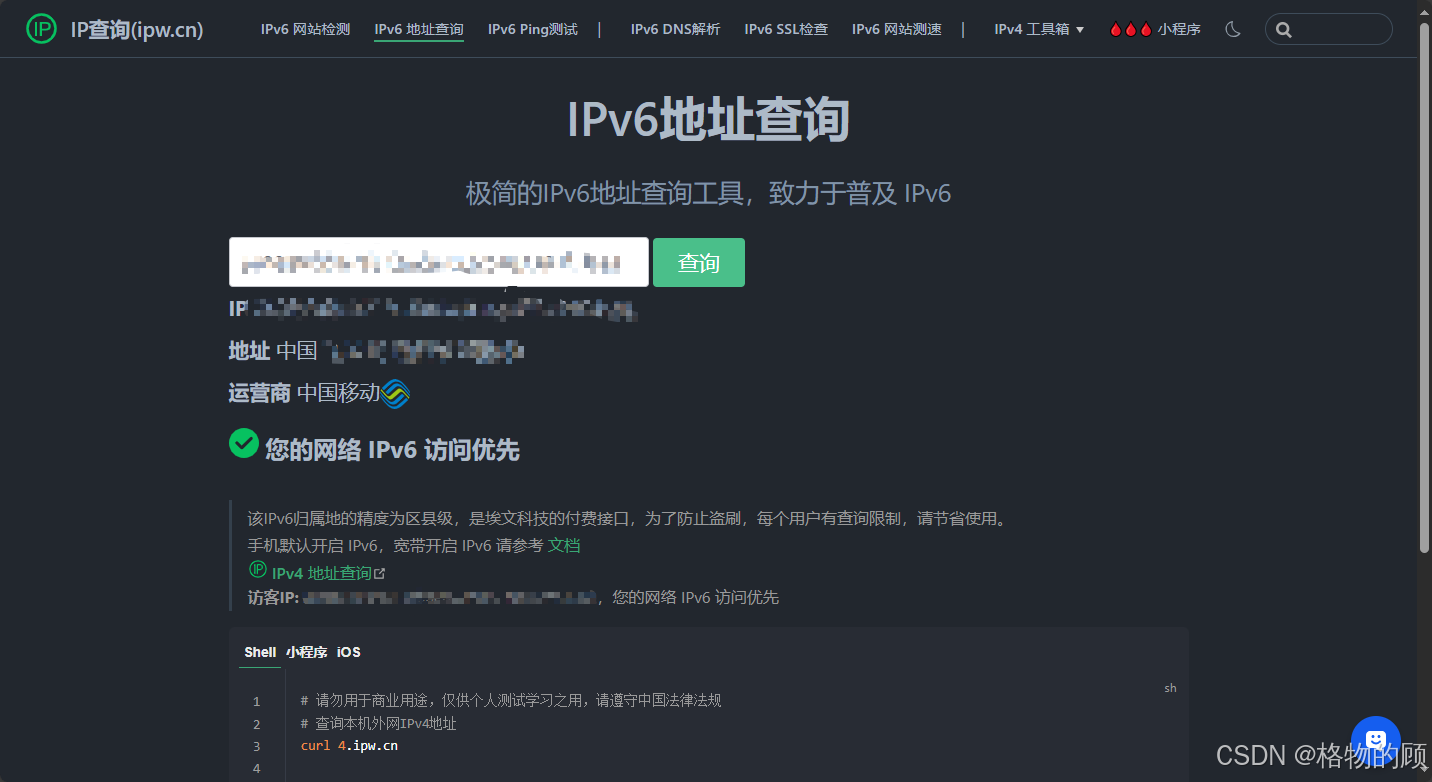
三、 开启IPV6
- IP协议类型:IPv6
- 状态:启用
- 复用IPv4拨号链路:打勾
- 保存

- IP协议类型:IPv6
- 状态:启用
- 前缀授权接口:WAN

Part 2:搭建服务器
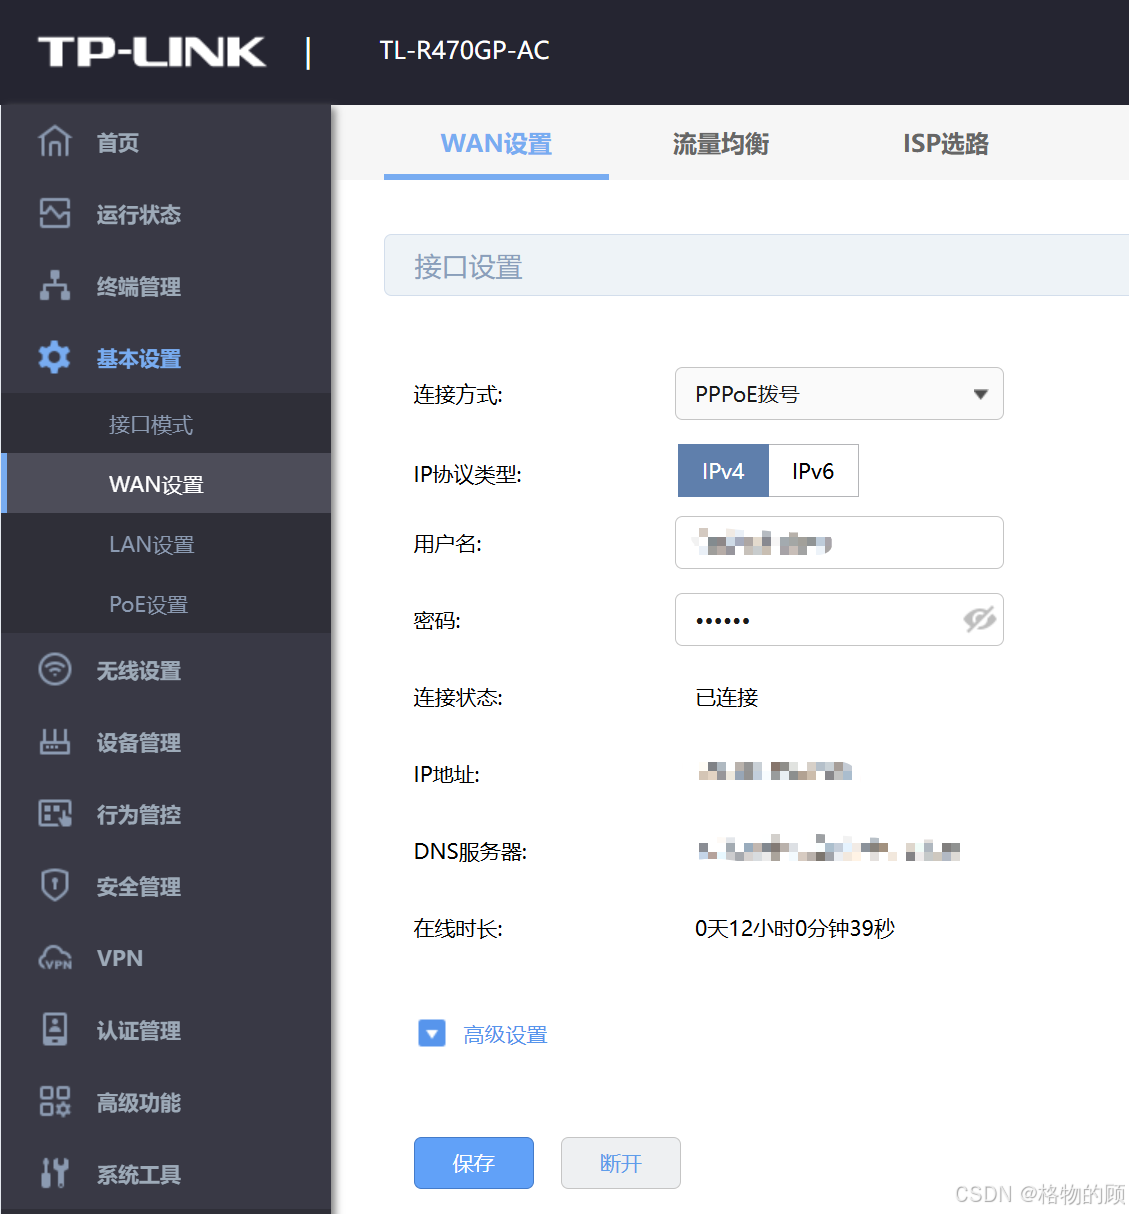
在确保IPv6配置完成的情况下,可以放心大胆的搭建服务器了。 服务器的话我选择安装pve,然后在里面创建虚拟服务器
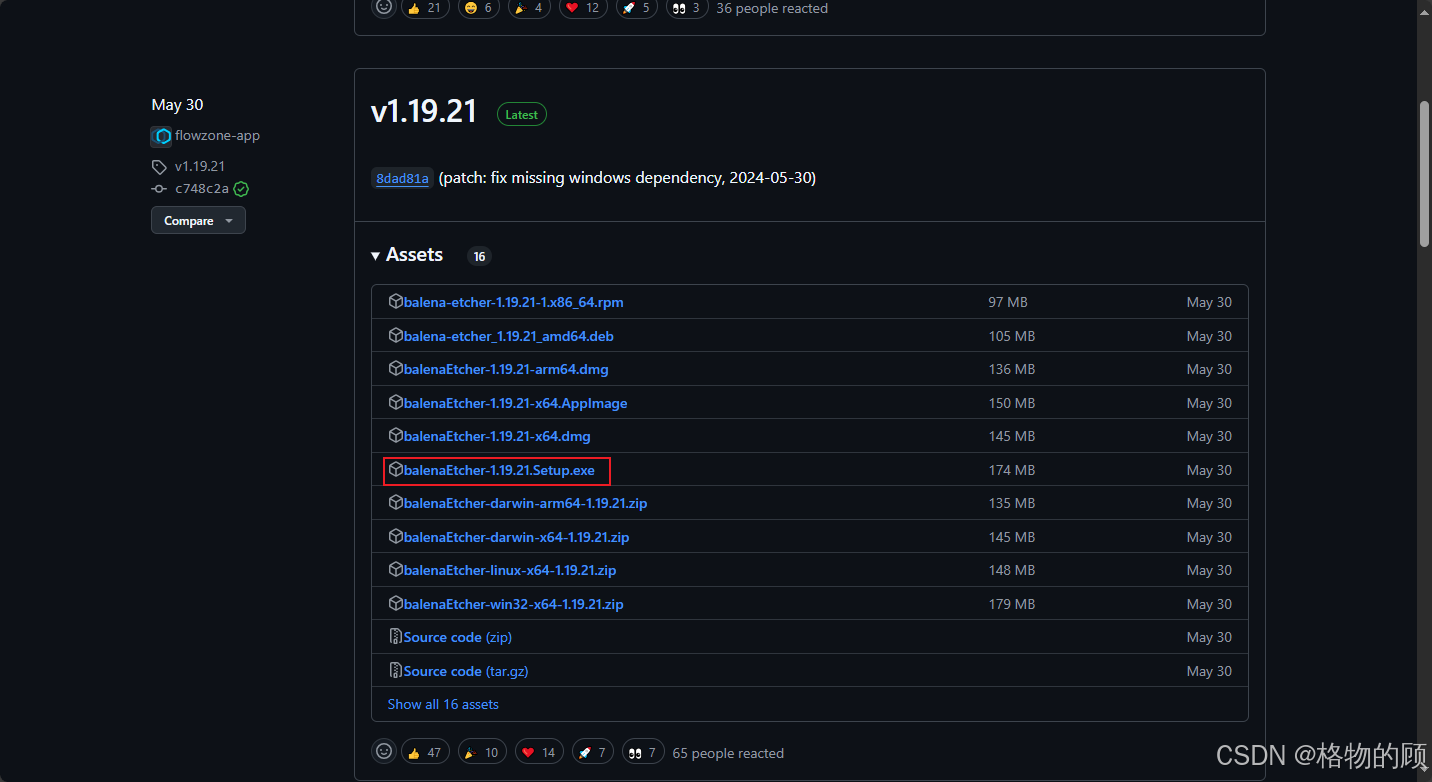
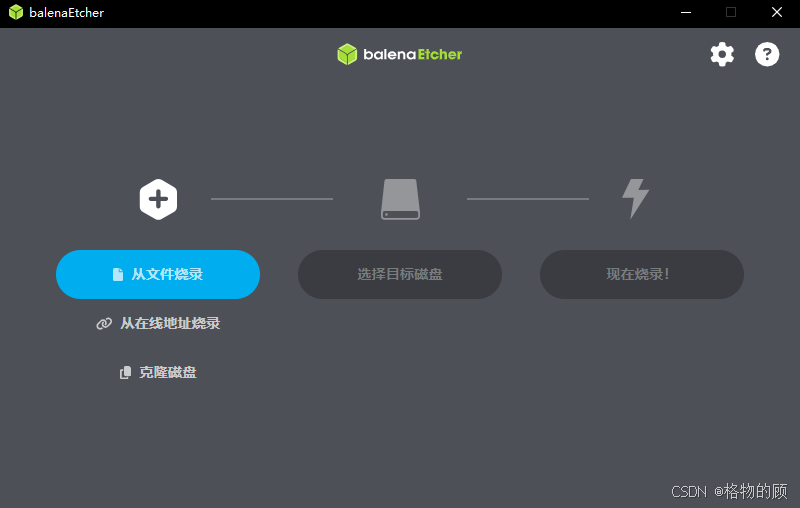
一、 制作PVE安装U盘
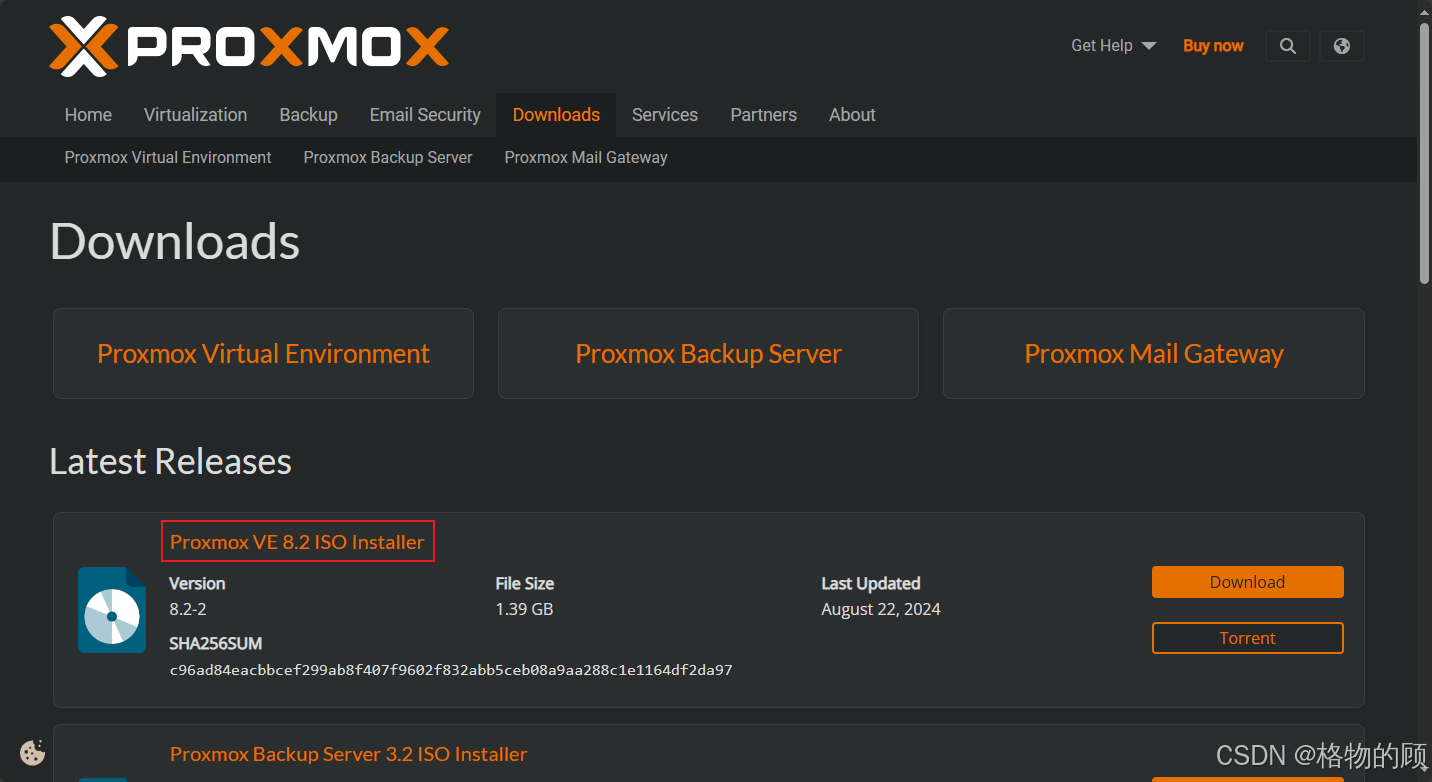
二、 给服务器安装PVE系统


三、 在PVE系统内安装Centos
- 阿里云开源镜像站:https://mirrors.aliyun.com/centos
- 北京大学开源镜像站:https://mirrors.pku.edu.cn/centos


四、 在PVE系统内安装Debian

Part 3:各种疑难杂症
CentOS 7 yum无法使用解决方法
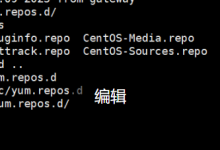
由于CentOS 7仓库已经被归档,当前的镜像地址无法找到所需的文件 进入/etc/yum.repos.d目录下找到CentOS-Base.repo修改前记得备份哦
# CentOS-Base.repo
#
# The mirror system uses the connecting IP address of the client and the
# update status of each mirror to pick mirrors that are updated to and
# geographically close to the client. You should use this for CentOS updates
# unless you are manually picking other mirrors.
#
# If the mirrorlist= does not work for you, as a fall back you can try the
# remarked out baseurl= line instead.
#
#
[base]
name=CentOS-$releasever – Base
#mirrorlist=http://mirrorlist.centos.org/?release=$releasever&arch=$basearch&repo=os&infra=$infra
#baseurl=http://mirror.centos.org/centos/$releasever/os/$basearch/
#baseurl=http://vault.centos.org/7.9.2009/x86_64/os/
baseurl=http://vault.centos.org/7.9.2009/os/$basearch/
gpgcheck=1
gpgkey=file:///etc/pki/rpm-gpg/RPM-GPG-KEY-CentOS-7
#released updates
[updates]
name=CentOS-$releasever – Updates
#mirrorlist=http://mirrorlist.centos.org/?release=$releasever&arch=$basearch&repo=updates&infra=$infra
#baseurl=http://mirror.centos.org/centos/$releasever/updates/$basearch/
#baseurl=http://vault.centos.org/7.9.2009/x86_64/os/
baseurl=http://vault.centos.org/7.9.2009/updates/$basearch/
gpgcheck=1
gpgkey=file:///etc/pki/rpm-gpg/RPM-GPG-KEY-CentOS-7
#additional packages that may be useful
[extras]
name=CentOS-$releasever – Extras
#mirrorlist=http://mirrorlist.centos.org/?release=$releasever&arch=$basearch&repo=extras&infra=$infra
#$baseurl=http://mirror.centos.org/centos/$releasever/extras/$basearch/
#baseurl=http://vault.centos.org/7.9.2009/x86_64/os/
baseurl=http://vault.centos.org/7.9.2009/extras/$basearch/
gpgcheck=1
gpgkey=file:///etc/pki/rpm-gpg/RPM-GPG-KEY-CentOS-7
#additional packages that extend functionality of existing packages
[centosplus]
name=CentOS-$releasever – Plus
#mirrorlist=http://mirrorlist.centos.org/?release=$releasever&arch=$basearch&repo=centosplus&infra=$infra
#baseurl=http://mirror.centos.org/centos/$releasever/centosplus/$basearch/
#baseurl=http://vault.centos.org/7.9.2009/x86_64/os/
baseurl=http://vault.centos.org/7.9.2009/centosplus/$basearch/
gpgcheck=1
enabled=0
gpgkey=file:///etc/pki/rpm-gpg/RPM-GPG-KEY-CentOS-7
修改完后依次执行
sudo yum clean all
sudo yum makecache
curl -o /etc/yum.repos.d/CentOS-Base.repo https://mirrors.aliyun.com/repo/Centos-7.repo
sudo yum clean all
sudo yum makecache
参考:CentOS 7 yum无法使用解决方法Could not retrieve mirrorlist http://mirrorlist.centos.org/?release=7&arch=
linux 磁盘扩容
方案一
root@debian:~# fdisk -l
Disk /dev/sda: 500 GiB, 536870912000 bytes, 1048576000 sectors
Disk model: QEMU HARDDISK
Units: sectors of 1 * 512 = 512 bytes
Sector size (logical/physical): 512 bytes / 512 bytes
I/O size (minimum/optimal): 512 bytes / 512 bytes
Disklabel type: dos
Disk identifier: 0xa1263a9c
Device Boot Start End Sectors Size Id Type
/dev/sda1 * 2048 999423 997376 487M 83 Linux
/dev/sda2 1001470 10483711 9482242 4.5G 5 Extended
/dev/sda5 1001472 10483711 9482240 4.5G 8e Linux LVM
Disk /dev/mapper/debian–vg-root: 3.56 GiB, 3825205248 bytes, 7471104 sectors
Units: sectors of 1 * 512 = 512 bytes
Sector size (logical/physical): 512 bytes / 512 bytes
I/O size (minimum/optimal): 512 bytes / 512 bytes
Disk /dev/mapper/debian–vg-swap_1: 980 MiB, 1027604480 bytes, 2007040 sectors
Units: sectors of 1 * 512 = 512 bytes
Sector size (logical/physical): 512 bytes / 512 bytes
I/O size (minimum/optimal): 512 bytes / 512 bytes
fdisk /dev/sda
之后分别按
- n:创建一个新的磁盘
- p:主分区
- ↩︎:盘符(默认)
- ↩︎:起始位置
- ↩︎:结束位置
- w:保存
root@debian:~# fdisk /dev/sda
Welcome to fdisk (util-linux 2.38.1).
Changes will remain in memory only, until you decide to write them.
Be careful before using the write command.
This disk is currently in use – repartitioning is probably a bad idea.
It's recommended to umount all file systems, and swapoff all swap
partitions on this disk.
Command (m for help): n
Partition type
p primary (1 primary, 1 extended, 2 free)
l logical (numbered from 5)
Select (default p): p
Partition number (3,4, default 3):
First sector (10483712-1048575999, default 10483712):
Last sector, +/-sectors or +/-size{K,M,G,T,P} (10483712-1048575999, default 1048575999):
Created a new partition 3 of type 'Linux' and of size 495 GiB.
Command (m for help): w
The partition table has been altered.
Syncing disks.
执行完成后可以再次执行fdisk -l查看新增出来的盘符
pvcreate /dev/sda3
其中/dev/sda3为新增的盘符
root@debian:~# pvcreate /dev/sda3
Physical volume "/dev/sda3" successfully created.
root@debian:~# vgdisplay
— Volume group —
VG Name debian-vg
System ID
Format lvm2
Metadata Areas 1
Metadata Sequence No 3
VG Access read/write
VG Status resizable
MAX LV 0
Cur LV 2
Open LV 2
Max PV 0
Cur PV 1
Act PV 1
VG Size <4.52 GiB
PE Size 4.00 MiB
Total PE 1157
Alloc PE / Size 1157 / <4.52 GiB
Free PE / Size 0 / 0
VG UUID dGcbvo-HCEY-y1NK-Ur0h-Jcz3-GrIJ-jrGJRo
vgextend debian-vg /dev/sda3
这里的debian-vg对应的是卷组信息中的VG Name,/dev/sda3为新增的盘符
root@debian:~# vgextend debian-vg /dev/sda3
Volume group "debian-vg" successfully extended
root@debian:~# df -lh
Filesystem Size Used Avail Use% Mounted on
udev 1.9G 0 1.9G 0% /dev
tmpfs 392M 532K 392M 1% /run
/dev/mapper/debian–vg-root 3.5G 2.1G 1.2G 64% /
tmpfs 2.0G 0 2.0G 0% /dev/shm
tmpfs 5.0M 0 5.0M 0% /run/lock
/dev/sda1 455M 59M 371M 14% /boot
tmpfs 392M 0 392M 0% /run/user/0
lvextend -l +100%FREE /dev/mapper/debian–vg-root /dev/sda3
/dev/mapper/debian–vg-root对应的是Mounted on根路径/,/dev/sda3为新增的盘符
root@debian:~# lvextend -l +100%FREE /dev/mapper/debian–vg-root /dev/sda3
Size of logical volume debian-vg/root changed from 3.56 GiB (912 extents) to 498.56 GiB (127632 extents).
Logical volume debian-vg/root successfully resized.
root@debian:~# cat /etc/fstab
# /etc/fstab: static file system information.
#
# Use 'blkid' to print the universally unique identifier for a
# device; this may be used with UUID= as a more robust way to name devices
# that works even if disks are added and removed. See fstab(5).
#
# systemd generates mount units based on this file, see systemd.mount(5).
# Please run 'systemctl daemon-reload' after making changes here.
#
# <file system> <mount point> <type> <options> <dump> <pass>
/dev/mapper/debian–vg-root / ext4 errors=remount-ro 0 1
# /boot was on /dev/sda1 during installation
UUID=dbb51c98-f3cb-4bc7-a6bc-4df422115c4b /boot ext2 defaults 0 2
/dev/mapper/debian–vg-swap_1 none swap sw 0 0
/dev/sr0 /media/cdrom0 udf,iso9660 user,noauto 0 0
- ext文件系统
resize2fs /dev/mapper/debian–vg-root
- XFS文件系统
xfs_growfs /dev/mapper/debian–vg-root
/dev/mapper/debian–vg-root对应的是Mounted on根路径/
root@debian:~# resize2fs /dev/mapper/debian–vg-root
resize2fs 1.47.0 (5-Feb-2023)
Filesystem at /dev/mapper/debian–vg-root is mounted on /; on-line resizing required
old_desc_blocks = 1, new_desc_blocks = 63
The filesystem on /dev/mapper/debian–vg-root is now 130695168 (4k) blocks long.
root@debian:~# df -lh
Filesystem Size Used Avail Use% Mounted on
udev 1.9G 0 1.9G 0% /dev
tmpfs 392M 532K 392M 1% /run
/dev/mapper/debian–vg-root 491G 2.1G 469G 1% /
tmpfs 2.0G 0 2.0G 0% /dev/shm
tmpfs 5.0M 0 5.0M 0% /run/lock
/dev/sda1 455M 59M 371M 14% /boot
tmpfs 392M 0 392M 0% /run/user/0
方案二
# CentOS
yum install parted
# Debian
apt install parted
fdisk -l
parted /dev/sda
- 打印出分区信息
- 进行扩容操作
resizepart 2 100%
- 退出
quit
pvresize /dev/sda2
lvresize –extents +100%FREE –resizefs /dev/mapper/debian–vg-root
PVE设置IPv6
使用SSH工具连接PVE服务器 在/etc/sysctl.conf文件当中添加如下信息
net.ipv6.conf.all.accept_ra=2
net.ipv6.conf.default.accept_ra=2
net.ipv6.conf.vmbr0.accept_ra=2
net.ipv6.conf.all.autoconf=1
net.ipv6.conf.default.autoconf=1
net.ipv6.conf.vmbr0.autoconf=1
重启PVE,这样外网就可以通过IPv6地址直接访问PEV及虚拟服务器了(大概!?@)
参考:pve设置IPv6
PVE开启vGPU支持
暂时没找到可行的方案


评论前必须登录!
注册